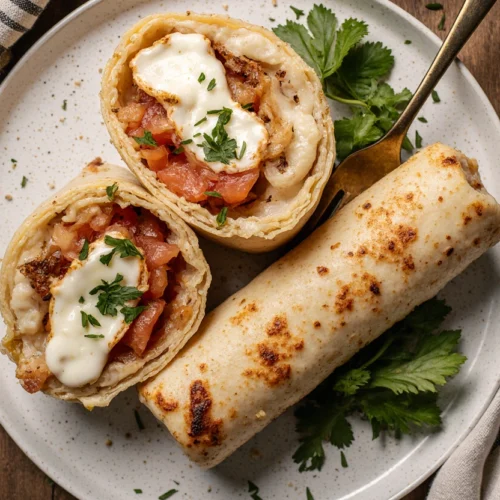
Crunchy Crispy Air Fryer Chicken & Mozzarella Wraps
An easy, family-friendly recipe for incredibly crispy and cheesy chicken wraps made in the air fryer, featuring a creamy ricotta and mozzarella filling with a perfectly golden, crunchy shell.
Ingredients
- For the Filling:
- 2 cups cooked chicken shredded or diced {approx. 280 grams}
- 1 ½ cups shredded mozzarella cheese {170 grams}
- ½ cup ricotta cheese {125 grams}
- ⅓ cup grated Parmesan cheese {30 grams}
- 1 teaspoon garlic powder {5 grams}
- 1 teaspoon dried oregano {1 gram}
- ½ teaspoon onion powder {1 gram}
- ¼ teaspoon freshly ground black pepper {0.5 grams}
- A pinch of crushed red pepper flakes optional
- 2 tablespoons chopped fresh parsley {8 grams}
- For Assembling & Cooking:
- 4 large 10-inch flour tortillas
- 1 tablespoon olive oil or melted butter {15 ml}
- Cooking spray
Instructions
- Step 1: Prepare Filling
- In a medium bowl, combine all filling ingredients: shredded chicken, mozzarella, ricotta, Parmesan, garlic powder, oregano, onion powder, black pepper, optional red pepper flakes, and parsley. Mix thoroughly until well combined and creamy.
- Step 2: Warm Tortillas
- Place tortillas on a plate, cover with a damp paper towel, and microwave for 20-30 seconds until soft and pliable. This prevents cracking.
- Step 3: Assemble Wraps
- Spoon about ¾ cup of filling onto the lower third of a warmed tortilla. Fold in the left and right sides, then roll tightly from the bottom to form a sealed burrito shape. Repeat with remaining tortillas and filling.
- Step 4: Crisp in Air Fryer
- Preheat air fryer to 375°F (190°C). Lightly brush or spray each wrap with olive oil or melted butter. Place wraps seam-side down in the air fryer basket in a single layer (cook in batches if needed). Air fry for 8-10 minutes, flipping halfway through, until golden brown and crispy.
- Step 5: Rest & Serve
- Carefully remove wraps from the air fryer and let them rest on a cutting board for 5 minutes before slicing. This allows the filling to set slightly for a clean cut.
Notes
For a gluten-free version, use certified gluten-free wraps. Leftovers reheat best in the air fryer to maintain crispiness. The filling can be made a day ahead and stored covered in the refrigerator.