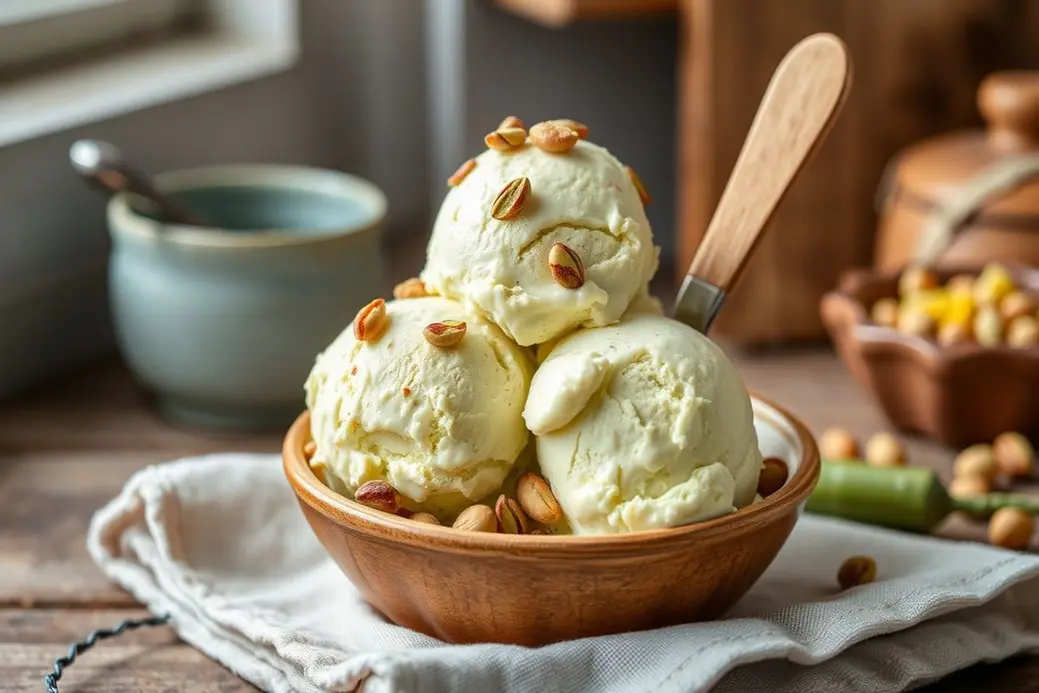
The Creamiest High Protein Pistachio Ice Cream Ever
Table of Contents
I still remember the first time I tried to make pistachio ice cream from scratch. It was one of those sticky summer afternoons when the kitchen felt like a sauna and I had just binge-watched a gelato-making competition on TV. I thought, “How hard could it be?” Spoiler: harder than I thought. But that first batch — gritty, pale green, and oddly chewy — taught me everything I needed to know about patience, temperature, and the magic of roasted nuts. Now, my High Protein Pistachio Ice Cream is the dessert I reach for when I want something indulgent but still feel like I’m making a smart choice. If you’re craving a creamy, nutty treat that won’t wreck your macros, this one’s for you. Oh, and if you’re hunting for more feel-good recipes, check out our Desserts page — you’ll find plenty of sweet inspiration there.

Why You’ll Love This Recipe
This ice cream is like a big, nutty hug in a bowl. The roasted pistachio flavor is deep and comforting, and the protein boost makes it feel like you’re treating yourself without the guilt spiral afterward.
Honestly, making this at home saves you a small fortune compared to those fancy protein ice creams at the store. Plus, you control the sweetness and can skip the weird stabilizers.
Even my nephew — who claims he “hates green food” — devoured a bowl and asked for seconds. The creamy texture and subtle sweetness win over even the pickiest eaters.
You can batch this on the weekend and have a healthy dessert ready for the whole week. It scoops beautifully straight from the freezer, so no need to wait around.
Serve it in pretty bowls with a sprinkle of crushed pistachios for a dinner party, and watch your guests’ eyes light up. It feels fancy but is secretly so easy.
The flavor is rich, nutty, and just sweet enough — with a silky texture that makes you want to close your eyes with every bite. It’s addictive in the best way.
Ingredient Breakdown
– 1 cup shelled roasted pistachios (unsalted)
– 1 ½ cups heavy cream
– 1 cup whole milk
– ½ cup vanilla protein powder (whey or plant-based)
– ½ cup honey or maple syrup
– 1 tsp vanilla extract
– Pinch of sea salt
The roasted pistachios are non-negotiable — trust me, I once tried this with raw nuts and it tasted like sweet green paste. Roasting brings out that deep, buttery flavor that makes pistachio ice cream so special.
Heavy cream gives that luscious mouthfeel, but I learned the hard way that skimping with half-and-half makes it icy and sad. Whole milk balances the richness without making it too heavy.
Protein powder is the secret weapon here. I use a vanilla whey isolate because it blends smoothly, but plant-based works too — just make sure it’s not the kind that clumps like concrete in liquid.
Honey or maple syrup adds natural sweetness and helps with texture. I once tried plain sugar and the ice cream froze into a rock — the liquid sweeteners keep it scoopable.
Vanilla extract rounds everything out, and that pinch of sea salt? It’s the difference between “meh” and “wow.” Don’t skip it.
Step-by-Step Instructions
Prep the Pistachios
Start by roughly chopping about ¼ cup of the pistachios and setting them aside — these will be your mix-ins later. Then, take the remaining ¾ cup and blitz them in a food processor until they’re finely ground but not pasty. I learned this the hard way when I over-processed and ended up with pistachio butter instead of a smooth base. Oops.
Warm the Dairy
In a medium saucepan, combine the heavy cream, whole milk, and ground pistachios. Warm over medium heat, stirring often, until it’s steaming but not boiling — about 5 minutes. You’ll smell that glorious nutty aroma filling your kitchen. Whatever you do, don’t let it boil or you’ll get that weird “cooked milk” flavor. I may have done that once and regretted it immediately.
Infuse the Flavor
Once steaming, remove from heat, cover, and let it steep for 30 minutes. This step is crucial — it’s when the pistachio flavor really sinks into the cream. I usually set a timer because I always forget and come back an hour later wondering why my ice cream base is cold.
Strain and Sweeten
Strain the mixture through a fine-mesh sieve into a clean bowl, pressing gently on the solids to extract maximum flavor. Discard the pistachio pulp (or snack on it if you’re weird like me). Whisk in the honey (or maple syrup), protein powder, vanilla extract, and salt until smooth. If the protein powder clumps, an immersion blender works wonders.
Chill Thoroughly
Cover and refrigerate the base for at least 4 hours, preferably overnight. I know it’s tempting to churn right away, but warm base = icy ice cream. Patience, my friend.
Churn the Ice Cream
Pour the chilled base into your ice cream maker and churn according to the manufacturer’s instructions — usually about 20-25 minutes. In the last 2 minutes, add the reserved chopped pistachios so they stay crunchy.
Freeze to Firm Up
Transfer the soft-serve consistency ice cream to a lidded container, press a piece of parchment paper directly onto the surface (this prevents ice crystals), and freeze for at least 4 hours or until firm.
Scoop and Serve
Let it sit at room temperature for 5 minutes before scooping. I always forget this step and end up with bent spoons and sore wrists.
What to Serve With
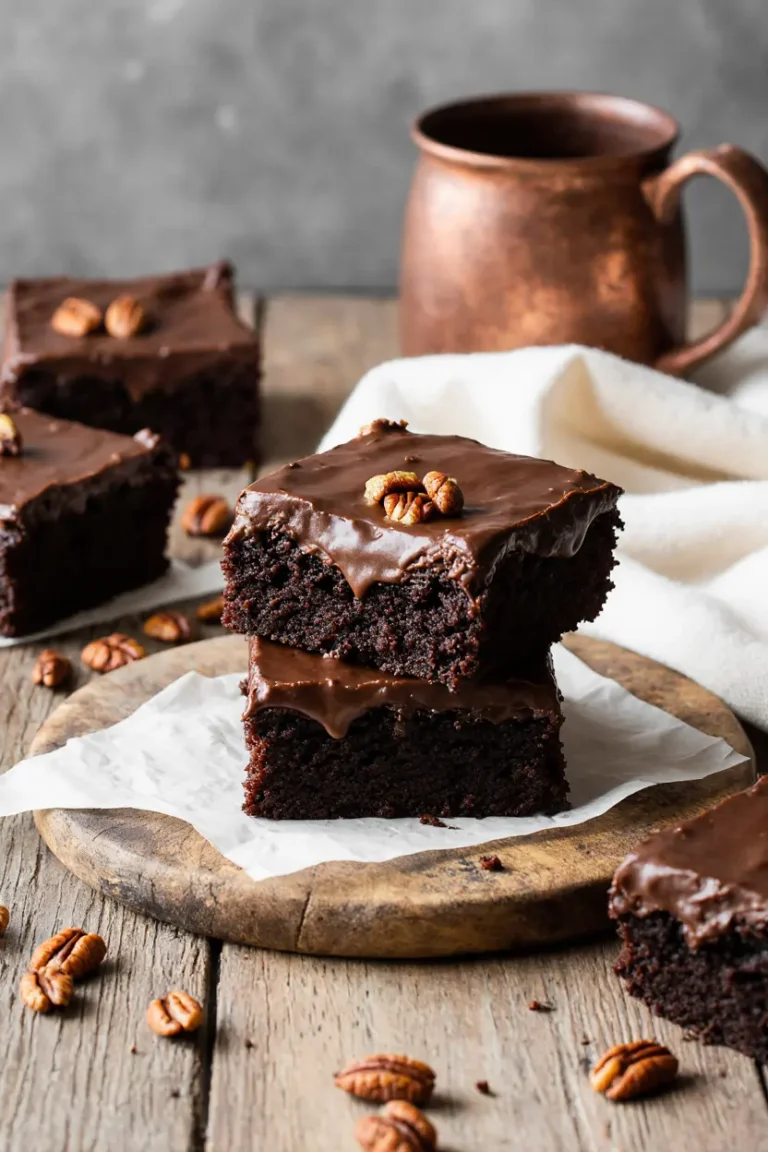
A warm, gooey brownie is the ultimate pairing — the contrast of hot and cold, fudgy and creamy is pure bliss. Plus, the chocolate brings out the nuttiness of the pistachios.
Fresh berries add a bright, tart counterpoint that cuts through the richness. I love raspberries for their color and zing — they make the whole dessert feel lighter.
A shot of espresso poured over a scoop turns this into an affogato situation, which is perfect for coffee lovers who want dessert and caffeine in one go.
Crumbled baklava on top takes it in a Middle Eastern direction — honey, phyllo, and pistachio are a match made in heaven.
Pro Tips and Variations
If you want a stronger pistachio punch, add ½ tsp almond extract — it enhances the nutty flavor without overpowering.
For a vegetarian twist, swap the honey for maple syrup and use plant-based protein powder. The texture stays creamy and dreamy.
This recipe is naturally gluten-free, but if you’re serving it with baked goods, double-check your ingredients. Gluten-free diet awareness is key for sensitive guests.
Want to impress? Serve in chilled glass bowls with a drizzle of dark chocolate and a dusting of edible gold leaf. Fancy, but worth it.
In summer, fold in fresh cherries or peaches during the last minute of churning for a seasonal twist.
Leftovers? Blend a scoop with a splash of milk for a protein-packed milkshake. I’ve done this for breakfast and felt like a genius.
Storing and Reheating
Store the ice cream in an airtight container in the freezer for up to 2 weeks. Press parchment or plastic wrap directly on the surface to prevent ice crystals.
Reheating isn’t really a thing for ice cream, but if it’s rock-hard, let it sit at room temp for 5-10 minutes. I once tried microwaving a scoop for 10 seconds and ended up with pistachio soup. Learn from my mistakes.
The texture holds up beautifully for the first few days, but after a week it can get a bit icier. Still delicious, just less silky.
Customizations for Special Diets
For gluten-free: This recipe is naturally gluten-free, but always check your protein powder and mix-ins for hidden gluten.
For dairy-free: Swap heavy cream and milk for full-fat coconut milk and cream. The flavor will be slightly tropical, but still delicious.
For low-fat: Use half-and-half instead of heavy cream and skim milk, but expect a less creamy texture. I’ve tried this — it’s still tasty, just more like a gelato.
For higher protein: Add an extra scoop of protein powder and reduce the honey slightly to balance sweetness.
Common Mistakes to Avoid
Not roasting the pistachios first is a rookie mistake I made early on. Raw pistachios taste flat and grassy — roast them for that deep, buttery flavor.
Skipping the steeping step means you lose that rich infusion. I once rushed and the ice cream tasted like sweet milk with a hint of “something green.”
Churning with a warm base is a fast track to icy disappointment. Always chill thoroughly — overnight is best.
Adding mix-ins too early makes them soggy. Fold in chopped pistachios in the last minute of churning for maximum crunch.
Using sugar instead of liquid sweetener can make the ice cream freeze too hard. Honey or maple syrup keeps it scoopable.
Frequently Asked Questions
Can I use salted pistachios?
You can, but reduce or omit the added salt in the recipe. I’ve done this in a pinch and it worked, but the flavor was a bit more savory than I liked.
Do I need an ice cream maker?
Technically no, but the texture won’t be as smooth. You can freeze the base in a shallow dish and stir every 30 minutes until firm, but it’s more work.
Can I use a different nut?
Sure! Almonds or hazelnuts work well, but the flavor will change. Pistachio is special because of its unique green hue and delicate taste.
How long does it last in the freezer?
Up to 2 weeks for best texture, but it’s safe to eat longer. After that, it might get a bit icy but still tastes great.
Can I make it vegan?
Yes — use coconut milk, maple syrup, and plant-based protein powder. The texture will be slightly different but still delicious.
Troubleshooting
| Problem | Cause | Solution |
| :— | :— | :— |
| Ice cream is too icy | Base not chilled enough or too little fat | Chill base overnight; don’t reduce cream |
| Too hard to scoop | Freezer too cold or not enough liquid sweetener | Let sit at room temp 5-10 min before scooping |
| Gritty texture | Protein powder not fully dissolved | Blend base with immersion blender before churning |
| Lacks pistachio flavor | Not enough nuts or skipped roasting | Use roasted nuts and steep properly |
| Mix-ins sank to bottom | Added too early or base too thin | Add in last minute of churning; ensure proper fat content |
Final Thoughts
This High Protein Pistachio Ice Cream has become my secret weapon for impressing friends and treating myself without the sugar crash. It’s one of those recipes that feels fancy but is actually pretty forgiving — even when I mess up the steeping time or over-churn by accident, it still turns out delicious. I’d love to hear how yours turns out! Did you add your own twist? Snap a photo and tag me — or just tell me in the comments what you served it with. What’s your favorite ice cream flavor to make at home?
Pistachio Protein Dream Ice Cream
Ingredients
- 1 cup raw pistachios — the unsalted, unroasted kind, because we’re fancy like that
- 1 can full-fat coconut milk — don’t even think about the light version, it’s a crime
- 1/2 cup vanilla protein powder — the good stuff, not the one that tastes like chalk
- 1/4 cup maple syrup — or honey if you’re feeling wild
- 1 tsp vanilla extract — the real deal, not that imitation nonsense
- Pinch of sea salt — because sweet needs a little salty sass
Instructions
- Toast the pistachios in a dry skillet over medium heat for about 5 minutes, stirring constantly. You’ll know they’re ready when your kitchen smells like a fancy Italian bakery. Don’t walk away — they burn faster than my last Tinder date ghosted me.
- Let the pistachios cool for a hot minute, then toss them in a blender with the coconut milk, protein powder, maple syrup, vanilla, and salt. Blend until it’s smoother than your excuses for skipping leg day.
- Taste the mixture. If it’s not sweet enough, add a splash more maple syrup. If it’s too thick, splash in a bit more coconut milk. This is your ice cream, you’re the boss.
- Pour the mixture into a freezer-safe container. I use a loaf pan because it’s what I have, but if you’re fancy, use an actual ice cream tub.
- Cover it tightly with plastic wrap or a lid, then freeze for at least 4 hours. If you can wait overnight, even better. But let’s be real, you’ll probably sneak a spoonful after 2 hours.
- When you’re ready to eat, let it sit at room temp for 10 minutes so it softens up. Scoop it into a bowl, top with extra chopped pistachios if you’re feeling extra extra, and enjoy the fact that you just made protein ice cream that doesn’t taste like sadness.