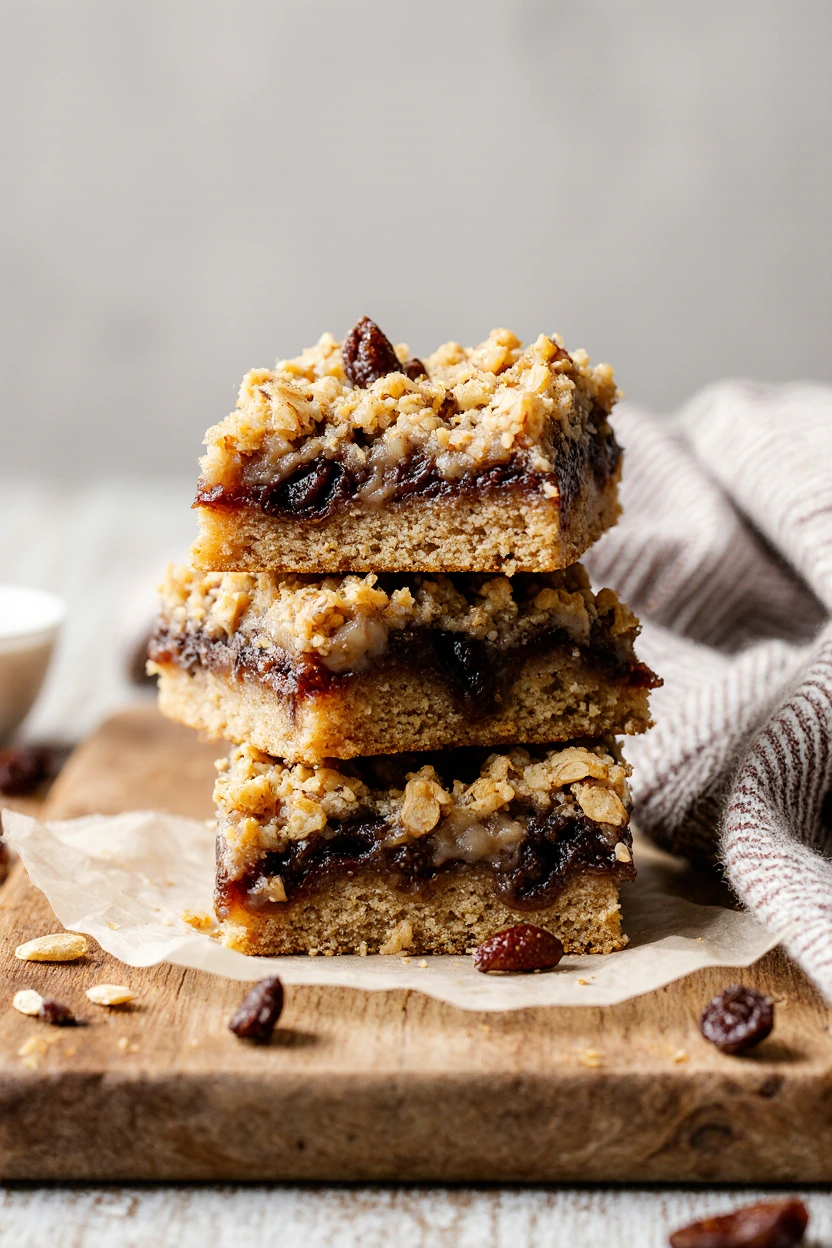
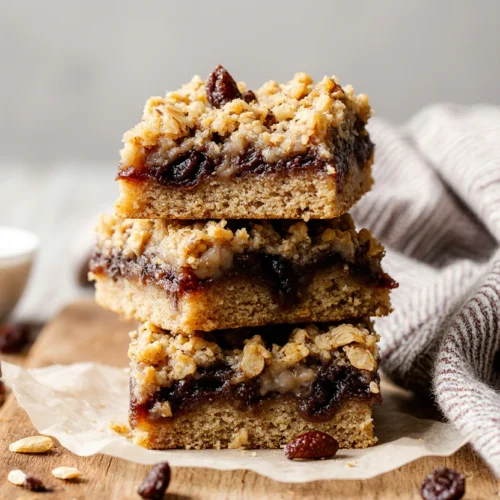
Oatmeal Raisin Cookie Bars
Table of Contents
Okay, let me set the scene for you. It was a Wednesday. Not just any Wednesday, but one of those endless, grey-sky Wednesdays where the kids were bouncing off the walls, my to-do list was laughing at me, and I had exactly zero energy to be a “Pinterest Mom.” But the craving hit—a deep, undeniable need for something warm, cinnamon-spiced, and chewy. An oatmeal raisin cookie. But the thought of standing there, scooping and baking batch after batch on a sheet pan? Absolutely not. I was too tired for that kind of commitment.
I stared at my mixing bowl, then at my 9×13 pan. And a truly chaotic, beautiful idea was born. What if… I just made the whole dang batch of cookie dough and pressed it into the pan? One pan. One mess. One giant, sheet-pan-sized cookie I could cut into squares. It was either a moment of lazy genius or a recipe for disaster. Honestly, I was prepared for either outcome.
I threw the ingredients together in the order my grandma taught me (butter and sugars first, always!), stirred in a truly irresponsible amount of vanilla, and yes, I absolutely spilled a little flour on the floor. Oops. I pressed that glorious dough into the pan, slid it into the oven, and about 25 minutes later… my house smelled like a bakery. A cozy, happy, warm bakery. The edges were golden and crisp, the center was just-set but still soft, and the raisins were little pockets of sweet jammy goodness.
I cut them into bars while they were still a little too warm, because I have no self-control, and that first bite? Pure bliss. All the homely, comforting flavor of my favorite cookie, but in a format that was somehow even more satisfying. Easier to share (or not share, I won’t tell), easier to store, and perfect for stuffing into lunchboxes. They were a smash hit. My chaotic Wednesday invention turned into our family’s most requested treat. These Oatmeal Raisin Cookie Bars are the hero we didn’t know we needed. They’re the cozy sweater of desserts, and I’m so excited to show you how to make them.

Why You’ll Love This Recipe
If you’re on the fence about turning a classic cookie into a bar, let me convince you. This recipe is a game-changer for so many reasons.
- They are unbelievably easy. No scooping, no rotating pans, no batch-baking. You mix one bowl of dough, press it into one pan, and bake it once. It’s the ultimate minimalist baking project, perfect for when you need a sweet fix without the fuss.
- The texture is pure magic. We’re achieving the perfect trilogy here: crispy, caramelized edges, a firm yet chewy body, and a soft, almost gooey center. Every square has a bit of every perfect cookie texture.
- They are the ultimate crowd-pleaser and travel treat. Bringing dessert to a potluck or party? These bars transport like a dream. No fragile, round cookies to stack. Just a pan of squares that are easy to serve and even easier to eat. They are the undisputed champions of bake sales and picnic baskets.
- They embrace imperfection. Listen, these are homestyle bars. They might sink a little in the middle, the edges might be darker than the center—that’s part of their charm! They are forgiving and rustic, which means you really can’t mess them up. No pastry chef perfection required here.
- The flavor is nostalgic comfort in a square. That combination of brown sugar, cinnamon, plump raisins, and hearty oats… it tastes like childhood, like home, like a hug. It’s a simple, timeless flavor profile that never goes out of style.
Let’s Talk Ingredients (The Building Blocks of Cozy)
Baking is a science, they say. And yeah, that’s true. But this is a friendly, forgiving science. Here’s what you’ll need, and why each ingredient is non-negotiable for the perfect bar.
The Wet Team (The Flavor Foundation):
- 1 cup (2 sticks) unsalted butter, softened: This is non-negotiable. It must be softened to room temperature, not melted. Think cool to the touch but your finger leaves a gentle indent. This creams beautifully with the sugar to create a light, tender crumb. If it’s melted, you’ll get greasy, dense bars. I’ve left mine on the counter for a good two hours, or you can dice it up to speed up the process.
- 1 cup packed light brown sugar: The MVP. Brown sugar gives us moisture, that distinct molasses-y flavor, and is responsible for the beautiful chew. Pack it firmly into your measuring cup!
- 1/2 cup granulated sugar: White sugar helps with spread and crispness. The combo of the two sugars is the secret to texture nirvana.
- 2 large eggs, at room temperature: Room temp eggs incorporate evenly into the butter and sugar mixture, creating a smoother, more emulsified batter. If you forget (I always do), just place the whole eggs in a bowl of warm water for 5-10 minutes.
- 1 tablespoon vanilla extract: A full tablespoon. This is not the time to be shy. Vanilla is the aromatic backbone that makes everything sing. Use the real stuff if you can.
The Dry Team (The Structure Squad):
- 1 1/2 cups all-purpose flour: The main structure. Spoon it into your measuring cup and level it off with a knife. Don’t scoop directly from the bag or you’ll pack in too much and get dry bars.
- 1 teaspoon baking soda: Our leavening agent. It helps the bars rise and become light, not brick-like. Make sure it’s not expired!
- 1 teaspoon ground cinnamon: Warm, cozy, essential. It’s the soul of an oatmeal raisin cookie.
- 1/2 teaspoon salt: The flavor enhancer. It balances all the sweetness and makes the other ingredients pop. I use fine sea salt.
- 3 cups old-fashioned rolled oats: NOT quick oats or instant oats. Old-fashioned rolled oats give us the perfect hearty, chewy texture and that classic oat flavor. Quick oats will turn to mush.
The Star of the Show:
- 1 1/2 cups raisins: I know, I know. Raisin debates are real. But here, they become little bursts of jammy sweetness. For a next-level move, plump your raisins first! See my tip below. You can also use a mix of raisins and another dried fruit if you’re feeling wild.
Step-by-Step: Making Magic in One Pan
Alright, apron on, oven preheating, let’s make some magic. I’ll walk you through this like we’re standing side-by-side in my flour-dusted kitchen.
1. Prep Work is Key. First, preheat your oven to 350°F (175°C). This gives it time to get perfectly, evenly hot. Then, grab your 9×13 inch metal baking pan. Do not use glass if you can help it—metal conducts heat better for a nicer bake on the bottom. Grease the pan really well with butter or non-stick spray. Then, for the ultimate insurance policy against sticking, line it with a sheet of parchment paper, leaving an overhang on the two long sides. This creates a “sling” that will let you lift the entire slab of bars out for perfect, clean cutting later. Trust me, this trick is life-changing.
2. Cream the Butter & Sugars (The Most Important Step). In a large mixing bowl, add your softened butter, packed brown sugar, and granulated sugar. Using a hand mixer or a stand mixer with the paddle attachment, beat this on medium speed for a good 2-3 minutes. Stop and scrape down the sides of the bowl once. You are looking for the mixture to become light, fluffy, and pale in color. This step isn’t just about mixing; it’s about incorporating air, which gives our bars lift and a tender texture. Don’t rush it. This is where I usually get a phone call and have to pause, and that’s fine too.
3. Incorporate the Eggs & Vanilla. Add the eggs, one at a time, beating well after each addition until fully blended. Then pour in that glorious tablespoon of vanilla. Mix just until combined. The batter might look a little curdled at this point if your eggs were cold—don’t panic. It’ll come together.
4. Whisk the Dry Ingredients. In a separate, medium bowl, whisk together the flour, baking soda, cinnamon, and salt. This ensures the baking soda is evenly distributed so you don’t get a bitter bite in one corner. I give it a good 20-30 second whisk.
5. Bring It All Together. With your mixer on low speed, gradually add the flour mixture to the wet ingredients. Mix just until the flour disappears. Do not overmix! Overmixing develops gluten and leads to tough bars. A few stray flour streaks are okay—they’ll get mixed in with the oats. Now, using a sturdy spatula or wooden spoon, stir in the rolled oats and raisins by hand. This dough is thick! It’s a workout. Fold and stir until every oat and raisin is coated and distributed.
6. Press and Bake. Transfer the thick, glorious dough to your prepared pan. Now, get in there with your clean, slightly damp hands (this prevents sticking) and press the dough into an even, firm layer across the bottom of the pan. Really press it down—this helps it bake evenly. Slide the pan into the center of your preheated oven.
7. The Bake & The Wait. Bake for 25-30 minutes. Ovens vary, so start checking at 25. You’re looking for the top to be golden brown all over, and the edges will be pulling away from the sides of the pan slightly. The center might still look a little soft—that’s perfect. It will set up as it cools. A toothpick inserted near the center should come out with a few moist crumbs, not wet batter. Do not overbake if you want chewy, not crunchy, bars.
8. The Crucial Cool. This is the hardest part. You must let the pan cool completely on a wire rack before you even think about cutting. I let mine cool for at least 2 hours. If you cut into warm bars, they will fall apart into a delicious, crumbly mess. The wait allows the structure to set. Use the parchment paper sling to lift the entire slab onto a cutting board, then slice into squares with a sharp knife.
Pro Tips & Variations (Make Them Your Own!)
Once you’ve mastered the basic bar, the fun begins. Here’s how to play.
- Plump Your Raisins: This is my #1 pro tip. Soak your raisins in very hot water (or hot apple juice for extra flavor!) for 10-15 minutes before adding them to the dough. Drain and pat them dry. This plumps them up, makes them juicier, and prevents them from drying out or burning in the oven.
- Add Some Crunch: Stir in 1/2 cup of chopped walnuts or pecans with the oats and raisins. The texture contrast is amazing.
- Chocolate Chip Twist: Replace 1 cup of the raisins with 1 cup of semi-sweet chocolate chips. Oatmeal chocolate chip cookie bars? Yes, please.
- Spice It Up: Add 1/4 teaspoon of ground nutmeg or ginger to the dry ingredients for a more complex spice profile.
- Sea Salt Finish: As soon as the bars come out of the oven, sprinkle the top very lightly with flaky sea salt. It takes them to a whole new level of sweet-and-salty perfection.
- Make Them Fancy: Drizzle cooled bars with a simple vanilla or cinnamon glaze.
What to Serve It With
These bars are a complete dessert on their own, honestly. But they’re also fantastic with a cold glass of milk, a hot cup of coffee, or a scoop of vanilla ice cream on top for an out-of-this-world dessert. They pair beautifully with a fresh fruit salad for a brunch spread, too.
Storage and Reheating Tips
Store cooled bars in an airtight container at room temperature for up to 5 days. They stay wonderfully soft and chewy. You can also freeze them for up to 3 months! Wrap individual bars tightly in plastic wrap and place them in a freezer bag. Thaw at room temperature or pop a frozen bar in the microwave for 15 seconds.
A quick note on reheating: If you like your bars a little warm and gooey, 10 seconds in the microwave is perfect. Any longer and they can become tough.
Frequently Asked Questions
Can I use quick oats?
I don’t recommend it for this recipe. Quick oats are cut smaller and absorb more moisture, which can lead to a denser, mushier bar. Old-fashioned rolled oats give the best texture.
My butter wasn’t fully soft, can I melt it?
I strongly advise against it. Melted butter will not cream with the sugars properly and will result in a greasier, denser bar that spreads too thin. Patience with softening is key!
Can I make these gluten-free?
Yes! Use a 1-to-1 gluten-free all-purpose flour blend (like Bob’s Red Mill) and ensure your oats are certified gluten-free. The texture will be slightly more crumbly but still delicious.
The middle sunk a little after baking. What did I do wrong?
This is common with dense, chewy bars and is usually not a mistake! It can happen if the center was slightly underbaked (which we want for chewiness) or simply due to the high moisture content from the brown sugar and raisins. It’s not a flaw; it’s a feature—that’s the chewy part!
Customizations for Special Diets
- Gluten-Free: As mentioned, use a certified GF flour blend and oats. You can learn more about the basics of a gluten-free diet for broader context.
- Dairy-Free: Use a high-quality plant-based butter stick (not the spreadable kind in a tub) that is meant for baking.
- Lower-Sugar: You can experiment with reducing the granulated sugar to 1/4 cup, but the texture will change. For info on alternative sweeteners, resources like a list of unrefined sweeteners can be helpful. Note that sugar is key for the structure and spread here.
Common Mistakes to Avoid
- Using Cold Ingredients: Cold butter and eggs won’t emulsify properly. Take the time to bring them to room temp.
- Overmixing After Adding Flour: This is the fast track to tough, dry bars. Mix just until combined.
- Overbaking: Set a timer! The bars continue to cook from residual heat in the pan. Pull them when the center looks just set.
- Cutting While Warm: I know, it’s torture. But warm bars will crumble. Let them cool completely for clean squares.
- Not Lining the Pan: Greasing is good, but parchment paper is a guarantee of easy removal and perfect edges.
Troubleshooting Table
| Problem | Likely Cause | How to Fix It Next Time |
|---|---|---|
| Bars are dry and crumbly | Too much flour, overbaked, or overmixed after adding flour. | Spoon and level flour. Set a timer and check early. Mix dry ingredients only until just combined. |
| Bars are greasy and dense | Butter was melted or too soft, or dough was overmixed. | Use softened, not melted, butter. Cream butter/sugar properly, but stop mixing once flour is incorporated. |
| Bars are too thin and spread too much | Butter was too warm, dough wasn’t pressed firmly into pan, or pan was too large. | Ensure butter is cool-soft. Press dough down firmly and evenly. Use correct 9×13 inch pan. |
| Edges are burnt, center raw | Oven runs hot, or pan is dark metal. | Use an oven thermometer. If using dark pan, reduce temp by 25°F and check earlier. Place pan in center rack. |
| Raisins are dry or burnt | Not plumped, or baked too long. | Plump raisins in hot liquid first. Ensure they are mixed in evenly and not all on top. |
Final Thoughts
These Oatmeal Raisin Cookie Bars are more than just a recipe to me now. They’re a symbol of a small victory—a moment where a little kitchen chaos led to something truly wonderful. They represent the joy of simplifying, of taking a classic and making it work for your real, messy, busy life.
They are the treat I make when I need to fill the house with a comforting smell, when I want to send a piece of home with my kids in their lunch, or when I just need a warm, chewy square of happiness with my afternoon coffee. They are unpretentious, deeply satisfying, and endlessly reliable.
So, I have to ask you—are you Team Raisin or Team Chocolate Chip when it comes to your oatmeal cookies? And what’s your go-to, no-fuss dessert when you need something sweet without the stress? Tell me all about it in the comments below! And if you’re looking for more easy, crowd-pleasing treats, be sure to explore my other favorite desserts for inspiration. Happy baking
Oatmeal Raisin Cookie Bars
Ingredients
Wet Ingredients:
- 1 cup 2 sticks unsalted butter, softened {226g}
- 1 cup packed light brown sugar {220g}
- 1/2 cup granulated sugar {100g}
- 2 large eggs at room temperature
- 1 tablespoon vanilla extract {15ml}
Dry Ingredients:
- 1 1/2 cups all-purpose flour {180g}
- 1 teaspoon baking soda
- 1 teaspoon ground cinnamon
- 1/2 teaspoon salt
Mix-Ins:
- 3 cups old-fashioned rolled oats {270g}
- 1 1/2 cups raisins {225g}
Instructions
Prep:
- Preheat oven to 350°F (175°C). Grease a 9×13 inch metal baking pan and line with parchment paper, leaving an overhang on the long sides.
Cream Butter & Sugars:
- In a large bowl using a hand mixer or stand mixer, beat the softened butter, brown sugar, and granulated sugar on medium speed for 2-3 minutes until light and fluffy.
Add Eggs & Vanilla:
- Add the eggs one at a time, beating well after each addition. Beat in the vanilla extract until just combined.
Combine Dry Ingredients:
- In a separate bowl, whisk together the flour, baking soda, cinnamon, and salt.
Form Dough:
- With the mixer on low, gradually add the flour mixture to the wet ingredients, mixing just until no dry flour remains.
- Using a sturdy spatula, stir in the rolled oats and raisins by hand until fully incorporated. The dough will be very thick.
Press & Bake:
- Transfer the dough to the prepared pan. Press it firmly and evenly into the pan with slightly damp hands.
- Bake for 25-30 minutes, until the top is golden brown and the edges are pulling away from the pan. The center may look slightly soft.
- Let the pan cool completely on a wire rack for at least 2 hours.
Slice & Serve:
- Use the parchment overhang to lift the slab from the pan. Place on a cutting board and slice into 24 squares with a sharp knife.