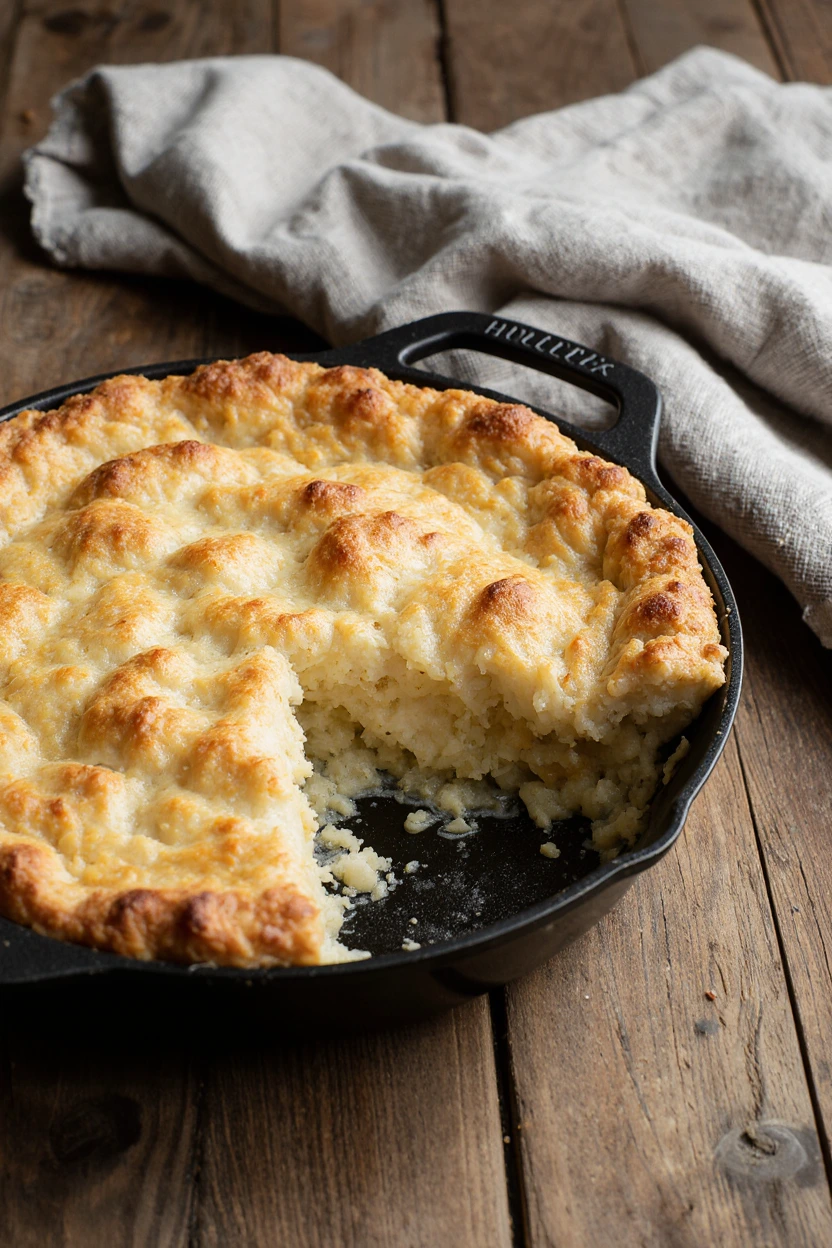
Hillbilly Pie (Poor Man’s Pie)
Table of Contents
Let me tell you about the day I first met Hillbilly Pie. It wasn’t in a fancy cookbook or on some gourmet cooking show. No, it was a Tuesday. One of those grey, drizzly Tuesdays where the world feels a little bit heavier, and your bank account feels a whole lot lighter. I was staring into a pantry that was practically echoing, trying to figure out how to make dinner out of a can of beans, a sack of potatoes, and a sad-looking onion. Takeout was not an option, and the grocery store felt like a marathon away. I was about to just give up and make, I don’t know, sad potato soup, when I remembered my grandma.
She never called it “Hillbilly Pie” or “Poor Man’s Pie.” To her, it was just “supper.” She’d talk about her mother making it during the Depression, how a few simple things from the root cellar could fill a whole table of hungry kids. With nothing to lose, I dug out her old, stained recipe card—more of a list of suggestions than actual instructions—and got to work. I had no high hopes, honestly. How good could mashed potatoes on top of beans really be?
Oh, friends. I was so wrong. What came out of my oven that day wasn’t just food. It was a revelation. A golden, crispy, cloud-like crown of potatoes, giving way to a rich, savory, deeply comforting filling of beans and vegetables. It was humble, yes. But it was also one of the most satisfying, soul-warming things I’d ever eaten. It tasted like resilience. It tasted like home. And it cost maybe three dollars to make the whole thing.
That’s the magic of this recipe. It doesn’t pretend to be something it’s not. It’s honest, hearty food born from making the absolute most of what you have. It’s the culinary equivalent of a cozy, worn-in sweater. And in a world that’s often too complicated and too expensive, this pie is a delicious, simple gift. It’s become my go-to for budget weeks, for cozy nights in, for when I need to feel grounded. Let me show you how to make it.

Why You’ll Love This Hillbilly Pie
If you’re still wondering if a pie with “hillbilly” in the name is for you, let me break it down. This recipe is a secret weapon for so many reasons.
- It’s the definition of comfort food. There’s something about that combination of creamy, fluffy potatoes and a savory bean filling that just speaks directly to your soul. It’s warm, it’s filling, and it makes you feel looked after, even if you’re the one who made it. It just makes ya feel hugged.
- Your wallet will thank you. Seriously. This is perhaps the most budget-friendly, delicious meal you can make. It uses inexpensive, pantry-stable staples. I’ve made this when my grocery budget was stretched thinner than cheap plastic wrap, and it felt like a feast. It’s a masterclass in frugal, delicious cooking.
- It’s incredibly forgiving and easy. No fancy techniques here. No tempering eggs or making pastry from scratch (unless you want to!). It’s basically: cook some veggies, mix them with beans, top with mashed potatoes, and bake. If you can boil water and stir a pot, you’ve got this. My first attempt was messy and lopsided and still tasted amazing.
- Leftovers are arguably better. This pie reheats like a dream. The flavors meld and deepen overnight in the fridge. A slice reheated for lunch the next day is a little moment of joy in the middle of a hectic day. It’s a fantastic meal-prep option.
- It’s a blank canvas for creativity. Got some leftover corn? Throw it in. A lonely carrot? Dice it up. A sprinkle of a different cheese? Go for it. This recipe is a guideline, a foundation. It welcomes your personal touch and whatever needs using up in your fridge.
Let’s Talk Ingredients (The Heart of the Humble Pie)
This is where the beauty of simplicity shines. Every ingredient has a job, and together, they create something far greater than the sum of their parts. Here’s what you’ll need, and my very opinionated thoughts on each.
For the Savory Filling:
- 1 tablespoon olive oil or butter: For sautéing. Butter adds richness, oil is fine too. I’ve used both depending on what’s on hand.
- 1 large yellow onion, diced: This is non-negotiable for me. Onions are the sweet, savory backbone of the filling. They melt down and add so much flavor.
- 2 cloves garlic, minced: Or, you know, three. I’m a garlic fiend. It adds that essential punch.
- 1 large carrot, diced small: This adds a touch of sweetness, a pop of color, and a wonderful texture. Don’t skip it!
- 1 rib of celery, diced small: The classic partner to onion and carrot. It builds a great flavor base.
- 2 (15 oz) cans of beans, drained and rinsed: This is your protein and heartiness. I use one can of kidney beans and one can of great northern or cannellini beans for a mix of texture and size. But use what you love! Pinto beans work great too. Draining and rinsing gets rid of excess sodium and that starchy can liquid.
- 1 (15 oz) can of diced tomatoes, with their juices: This provides the saucy element. The acidity from the tomatoes balances everything out perfectly.
- 1 cup vegetable broth: This loosens the filling to the perfect saucy consistency. You can use a beef-style broth if you prefer a deeper, meatier flavor, but a good veggie broth keeps it wonderfully accessible and flavorful.
- 1 teaspoon dried thyme: Herby, earthy, perfect.
- 1 teaspoon smoked paprika: This is my not-so-secret weapon. It adds a subtle smokiness and depth that makes the whole dish sing. Regular paprika works in a pinch, but smoked is a game-changer.
- Salt and black pepper to taste: Season in layers! Taste as you go.
For the Cloud-Like Potato Topping:
- 2 pounds russet potatoes (about 3-4 large ones), peeled and cut into chunks: Russets are the best here. They’re starchy and fluffy, making for the lightest, dreamiest mash. Yukon Golds are creamier and will work, but the texture is different.
- 4 tablespoons (1/2 stick) butter, softened: Real butter, please. This is for flavor and richness. It makes the potatoes luxurious.
- 1/2 cup milk, warmed: Whole milk is ideal for creaminess. Warm it up a bit before adding so it doesn’t shock the potatoes and make them gummy.
- Salt to taste: Potatoes need a good amount of salt. Don’t be shy.
Optional, but Highly Recommended Finishes:
- A big handful of shredded sharp cheddar cheese: Sprinkled on top for the last 10 minutes of baking. It gets bubbly and golden and is just… yes.
- A sprinkle of chopped fresh parsley or chives: For a little color and freshness right at the end.
Step-by-Step: Building Your Pie of Peace
Okay, apron on, music playing, let’s do this. I’ll walk you through it just like I wish someone had for me the first time, spills and all.
1. Start the Spuds. First things first, get your potatoes going. Put the peeled and chopped potatoes in a large pot and cover them with cold water by about an inch. Add a big pinch of salt to the water—this seasons them from the inside out, a tip I learned the hard way after years of bland mash. Bring it to a boil over high heat, then reduce to a lively simmer. Let them cook for 15-20 minutes, until they are completely fork-tender. You should be able to easily slide a fork into a chunk with no resistance. While they cook, you can make the filling. Multitasking win!
2. Build the Flavor Base (The Filling). While the potatoes bubble away, grab a large, deep skillet or a Dutch oven. Heat the oil or butter over medium heat. Once it’s shimmering (or the butter is foaming), add the diced onion, carrot, and celery. This holy trinity is called a mirepoix, and it’s the start of so many good things. Cook, stirring now and then, for about 8-10 minutes. You want the onions to be soft and translucent and the carrots to have just started to soften. This isn’t a race—letting them cook slowly builds a sweet, deep flavor. Now, add the minced garlic and cook for just one more minute, until fragrant. Don’t let the garlic burn! I’ve done that. It makes everything taste bitter. Oops.
3. Simmer the Heart of the Pie. To the veggie mixture, add the drained beans, the can of tomatoes with their juices, the vegetable broth, thyme, and smoked paprika. Give it all a really good stir. Bring it up to a simmer, then reduce the heat to low. Let it bubble gently, uncovered, for about 15-20 minutes. This is where the magic happens. The liquid will reduce slightly, the flavors will marry, and the filling will thicken to a perfect, spoonable consistency. Give it a taste here. This is your moment! Season with salt and pepper until it tastes good to you. Remember, the potatoes will be mild, so the filling should be well-seasoned. Take it off the heat.
4. Create the Fluffy Potato Blanket. By now, your potatoes should be done. Carefully drain them in a colander and let them steam-dry for a minute in the pot—this gets rid of excess water so your mash isn’t soggy. Now, the fun part: mashing. You can use a potato masher, a ricer, or even a hand mixer. I’m a masher girl myself; I like a few tiny lumps for texture. Add the softened butter and start mashing. Once the butter is incorporated, slowly pour in the warm milk while you mash. Keep going until you have a smooth, fluffy, creamy situation. Season generously with salt. Seriously, taste it. It should taste delicious on its own.
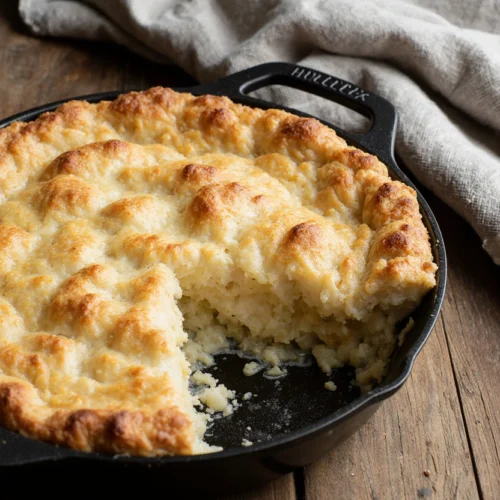
5. Assemble and Bake to Golden Glory. Preheat your oven to 400°F (200°C). Grab a 9-inch pie dish, a 9×9 baking dish, or even a deep skillet that’s oven-safe. Pour the warm bean filling into the bottom and spread it out evenly. Now, dollop the mashed potatoes all over the top. Don’t plop it all in the middle! Use a spoon or spatula to gently spread the potatoes to the edges, covering the filling completely. Here’s a pro move I learned from my third attempt: use a fork to create little peaks and swirls all over the top. This isn’t just for looks—those peaks get extra crispy and golden in the oven. If you’re using cheese, sprinkle it over the top now.
6. The Final Transformation. Slide your beautiful, rustic creation into the hot oven. Bake for 25-30 minutes. You’re waiting for two things: the filling should be bubbly around the edges (you might see little lava bubbles pushing through), and the potato topping should be gloriously golden brown with those crispy fork marks. If you added cheese, it should be melted and spotty brown. Your kitchen will smell like a cozy dream. Take it out and let it sit for about 10 minutes before diving in. I know, the wait is torture. But it lets the filling set a bit so you get a clean slice instead of a delicious landslide.
Pro Tips & Variations (Make It Your Own!)
Once you’ve mastered the basic version, the world is your oyster. Or, you know, your pie.
- Make it “Meatier”: When browning the veggies, you can add 1/2 pound of ground beef or turkey. Just cook it with the onions until it’s no longer pink, then proceed. It adds a different kind of heartiness.
- Add Greens: Stir a couple of large handfuls of fresh spinach or chopped kale into the filling during the last 2 minutes of simmering. It wilts right in.
- Spice it Up: Add a pinch of red pepper flakes with the garlic, or a dash of hot sauce to the filling.
- Herb It Up: Fresh rosemary or sage, finely chopped, is incredible with the beans. Add it when you add the garlic.
- Leftover Magic: Turn leftover pie into the world’s best cottage pie soup. Thin a slice with some extra broth in a pot, heat, and you have instant soup.
- My Favorite Twist: I sometimes add a teaspoon of tomato paste to the veggies after they’ve softened and cook it for a minute before adding the beans. It adds a real depth of tomato flavor. So good.
What to Serve It With
This pie is a complete meal in a dish, honestly. But if you want to round things out, a simple green salad with a tangy vinaigrette is perfect for cutting the richness. A side of steamed green beans or roasted broccoli works beautifully too. For drinks, a cold glass of milk, a hoppy ale, or a simple iced tea are all great companions. This dish and a cozy blanket? Now that’s a perfect night in.
Storage and Reheating Tips
This pie is a champion of leftovers. Let it cool completely, then cover tightly or transfer slices to an airtight container. It will keep in the fridge for up to 4 days.
To reheat, do not just microwave a whole slice—the potatoes can become gummy and the sauce might separate. For the best results, reheat individual portions in a toaster oven or regular oven at 350°F until heated through (about 15-20 minutes). You can also reheat gently in a covered skillet on the stovetop with a tiny splash of water or broth to keep it moist. The microwave can work in a pinch for a single serving, but use a lower power setting and cover it.
You can also freeze the baked pie (or unbaked assembled pie) for up to 3 months. Thaw overnight in the fridge before reheating or baking.
Frequently Asked Questions
Can I use instant mashed potatoes?
You know, in a true pinch, yes. I’ve done it. Prepare them according to the package directions, but make them a bit stiffer than you normally would (use less liquid). The texture and flavor aren’t quite the same as real mashed potatoes, but it will work in a crisis. No judgment here.
What kind of dish should I bake it in?
A standard 9-inch pie dish, a 9×9 square baking dish, or a 10-inch oven-safe skillet are all perfect. Just make sure it’s deep enough to hold all the filling and topping.
My filling is too watery. What did I do wrong?
You probably didn’t simmer it long enough to reduce the liquid. No worries! You can mix a teaspoon of cornstarch with a tablespoon of cold water and stir it into the simmering filling. Let it cook for another 2-3 minutes until thickened. Or, just simmer it a bit longer uncovered.
Can I make this ahead of time?
Absolutely! Assemble the whole pie, cover tightly, and refrigerate for up to 24 hours before baking. You may need to add 5-10 minutes to the bake time since it will be going in cold.
Customizations for Special Diets
- Gluten-Free: This recipe is naturally gluten-free! Just double-check that your broth and any other packaged ingredients are certified gluten-free if that’s a concern. For more info on gluten-free eating, you can always check out reliable resources.
- Dairy-Free/Vegan: Use olive oil instead of butter for sautéing. For the potatoes, use a plant-based butter and unsweetened, unflavored plant milk (like oat or almond). Skip the cheese topping or use a vegan shred.
- Lower-Fat: You can reduce the butter in the potatoes and use a low-fat milk. For the filling, use a lean broth and focus on loading up the vegetables.
Common Mistakes to Avoid
- Underseasoning the Potatoes: This is the #1 mistake. Potatoes are a blank canvas that need salt. Taste your mash before you put it on the pie!
- Not Letting the Filling Thicken: If you pour a soupy filling into the dish, you’ll get a soggy potato topping. Simmer until it’s the consistency of a thick stew.
- Skipping the Resting Time: Cutting into the pie straight from the oven is a recipe for a sloppy mess. Let it set for 10 minutes for clean slices.
- Overworking the Potatoes: If you mash or mix them too aggressively, they can become gluey. Mash just until smooth.
Troubleshooting Table
| Problem | Likely Cause | How to Fix It Next Time |
|---|---|---|
| Watery, loose filling | Didn’t simmer long enough, or canned beans/tomatoes weren’t drained well. | Simmer filling uncovered until liquid reduces. Always drain and rinse beans thoroughly. |
| Soggy potato topping | Filling was too wet, or potatoes were too watery when mashed. | Ensure filling is thick. Let drained potatoes steam-dry in the hot pot for a minute before mashing. |
| Gluey, gummy potatoes | Overworked or over-mashed the potatoes. | Mash just until combined and smooth. Using a ricer helps avoid this. |
| Bland flavor | Not enough salt or seasoning in layers. | Season the filling well as it simmers, and don’t forget to salt the potato water and the mash itself. |
| Topping not browning | Oven not hot enough, or cheese (if using) added too early. | Ensure oven is fully preheated. Add cheese only in the last 10 minutes of baking. |
Final Thoughts
This Hillbilly Pie is more than a recipe to me now. It’s a reminder that abundance isn’t about having the most expensive ingredients; it’s about creativity and heart. It’s about the deep satisfaction that comes from making something truly wonderful out of simple, honest things. It connects me to my family’s past, grounds me in the present, and always, always leaves me feeling full in the best way possible.
It’s the dish I make when I need comfort, when I want to stretch a dollar, or when I just want to feed people I love with something that feels like a hug on a plate. It’s imperfect, humble, and absolutely perfect.
So, I’d love to know—what’s your version of “hillbilly pie”? What’s the simple, humble dish that feels like home to you? Do you have a family recipe that’s built on making the most of what you have? Share your stories in the comments below. And if you’re looking for more hearty, comforting ideas that won’t break the bank, be sure to browse my other favorite main dishes for inspiration.
Hillbilly Pie (Poor Man’s Pie)
Ingredients
For the Savory Filling:
- 1 tablespoon olive oil or butter {15 ml}
- 1 large yellow onion diced (about 1 1/2 cups {225g})
- 2 cloves garlic minced
- 1 large carrot diced small (about 1 cup {130g})
- 1 rib celery diced small (about 1/2 cup {65g})
- 2 15 oz cans of beans, drained and rinsed (e.g., kidney & cannellini) {425g each}
- 1 15 oz can diced tomatoes, with juices {425g}
- 1 cup vegetable broth {240 ml}
- 1 teaspoon dried thyme
- 1 teaspoon smoked paprika
- Salt and black pepper to taste
For the Potato Topping:
- 2 pounds russet potatoes peeled and cut into chunks {900g}
- 4 tablespoons 1/2 stick butter, softened {55g}
- 1/2 cup milk warmed {120 ml}
- Salt to taste
Optional Finish:
- 1/2 cup shredded sharp cheddar cheese {55g}
- Chopped fresh parsley or chives for garnish
Instructions
Cook the Potatoes:
- Place peeled and chopped potatoes in a large pot. Cover with cold water by 1 inch, add a big pinch of salt, and bring to a boil. Reduce heat and simmer for 15-20 minutes, until fork-tender. Drain and let steam dry in the pot for a minute.
Prepare the Filling:
- While potatoes cook, heat oil in a large skillet or Dutch oven over medium heat. Add onion, carrot, and celery. Cook for 8-10 minutes until softened.
- Add garlic and cook for 1 more minute until fragrant.
- Stir in drained beans, diced tomatoes with juices, vegetable broth, thyme, and smoked paprika. Bring to a simmer.
- Reduce heat to low and simmer uncovered for 15-20 minutes, until slightly thickened. Season well with salt and pepper. Remove from heat.
Make the Mashed Potatoes:
- Mash the drained potatoes with a masher or ricer. Add the softened butter and mash until incorporated.
- Gradually add the warm milk while mashing until smooth and fluffy. Season generously with salt.
Assemble and Bake:
- Preheat oven to 400°F (200°C). Pour the bean filling into a 9-inch pie dish or 9×9 baking dish.
- Dollop mashed potatoes over the filling and spread gently to cover completely, creating peaks with a fork.
- If using, sprinkle cheese over the top.
- Bake for 25-30 minutes, until filling is bubbly and topping is golden brown.
- Let rest for 10 minutes before serving.