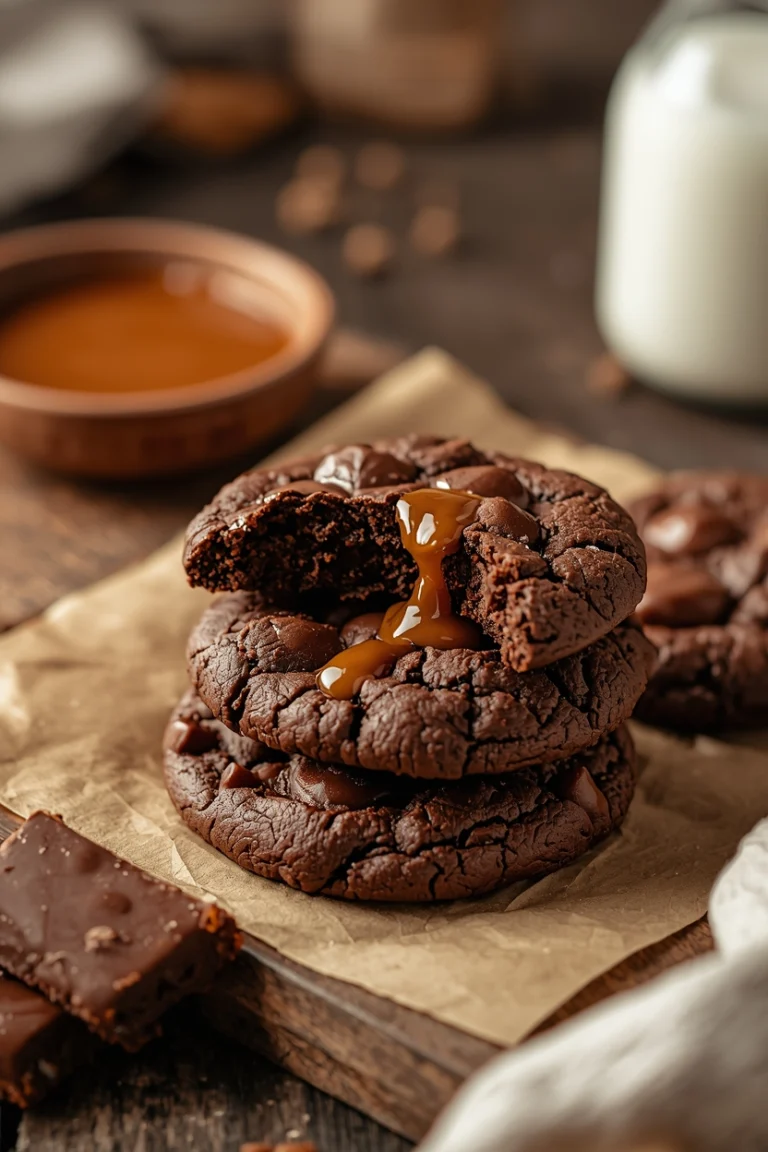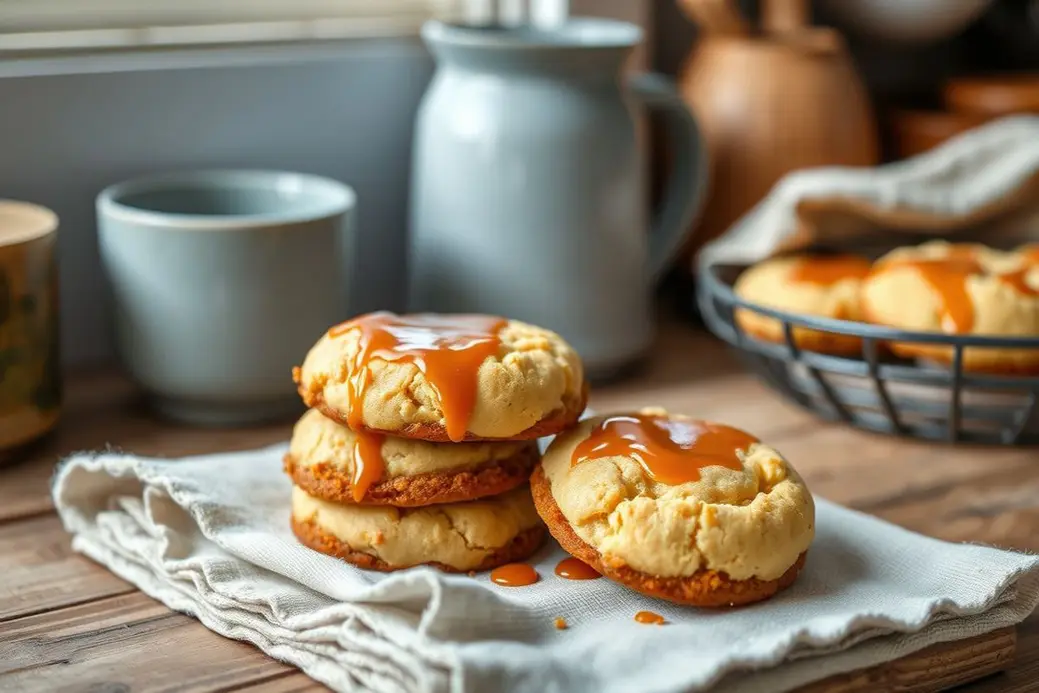
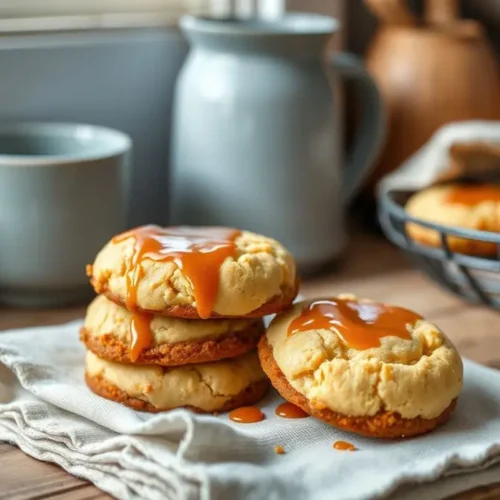
Caramel Cheesecake Cookies: Better Than Cake
Caramel Cheesecake Cookies. The name alone makes my mouth water, honestly. The first time I made these was during a rainy Sunday when my kitchen smelled like a bakery and my dog was curled up on the rug. I’d been craving something sweet but not too sweet — something that felt like a warm hug but still had that little crunch. I didn’t expect that combining cheesecake and caramel into a cookie would be such a game-changer. If you’re into cozy baking experiments, you might also love my Desserts section for more sweet inspiration.
Table of Contents
Why You’ll Love This Recipe
These cookies are the kind of treat that feels like wrapping yourself in a soft blanket after a long day. The creamy cheesecake center melts into the caramel, and the cookie shell gives just enough crunch to keep things interesting. It’s pure comfort food.
Let’s be real — buying cookies at a bakery or café can cost a fortune, especially when you want something gourmet. Making these at home means you get a whole batch for the price of two store-bought ones. Plus, you control the ingredients.
If you’ve got picky eaters at home (I do!), these are a sneaky win. The caramel hides inside, so kids who “don’t like cheesecake” end up devouring them. It’s like a surprise party in every bite.
You can make the dough ahead and freeze it, then bake fresh cookies whenever you want. They store well in the fridge for up to a week, though in my house they never last more than two days. Perfect for meal prep dessert lovers.
Want to impress someone special? Serve these warm with a scoop of vanilla ice cream and a drizzle of extra caramel. They look fancy but are secretly easy. I once made them for a date night and got major brownie points.
The flavor is addictive — buttery cookie, tangy cheesecake, gooey caramel, and a hint of salt. It’s the kind of thing you take one bite of and immediately want another. Warning: self-control may vanish.
Ingredient Breakdown
– 1 cup unsalted butter, softened (I use Kerrygold because it’s richer, but honestly any good butter works — just don’t use margarine, it’s a crime against cookies)
– 3/4 cup brown sugar, packed (light or dark, doesn’t matter — I’ve used both and they’re both delicious)
– 1/2 cup granulated sugar (plain white sugar, nothing fancy here)
– 2 large eggs (room temperature if you remember, but cold works too — I’ve forgotten and it was fine)
– 2 tsp vanilla extract (please use real vanilla, not that fake stuff — it’s worth it)
– 2 1/4 cups all-purpose flour (I once tried whole wheat and they turned into hockey pucks — stick to AP)
– 1 tsp baking soda (make sure it’s fresh, old baking soda = flat cookies)
– 1/2 tsp salt (I use sea salt, but table salt is fine — just don’t skip it)
– 8 oz cream cheese, softened (full fat, please — low-fat cream cheese makes the filling watery and sad)
– 1/2 cup powdered sugar (for the cheesecake filling)
– 1/2 cup caramel sauce (store-bought or homemade — I usually cheat with store-bought because life’s short)
I didn’t expect that the cream cheese would be such a diva. If it’s not softened enough, you’ll get lumps in your filling and it’s just… disappointing. Also, the caramel sauce? Don’t go too runny or it’ll leak out during baking. I learned that the hard way when I tried using a fancy artisanal caramel that was more like a syrup — total mess.
Step-by-Step Instructions
Prep the Cheesecake Filling
Start by mixing the softened cream cheese with powdered sugar until smooth. I use a hand mixer because I’m lazy, but a whisk works if you want an arm workout. The filling should be thick but spreadable. Pop it in the fridge while you make the cookie dough — this helps it firm up so it doesn’t ooze everywhere later.
Make the Cookie Dough
In a large bowl, cream together the butter and both sugars until light and fluffy. This takes about 2-3 minutes with an electric mixer. Add the eggs one at a time, then the vanilla. Mix until just combined. In a separate bowl, whisk the flour, baking soda, and salt. Gradually add the dry ingredients to the wet, mixing on low until just combined. Don’t overmix or your cookies will be tough — I’ve done this and regretted it.
Assemble the Cookies
Scoop about a tablespoon of cookie dough and flatten it in your palm. Add a small dollop of the cheesecake filling (about a teaspoon) and a little caramel sauce. Top with another flattened piece of dough and seal the edges. Roll gently into a ball. This part is messy — expect caramel on your fingers and possibly your face. I once got caramel in my hair and had to explain it to my neighbor when I went to get the mail.
Bake
Preheat your oven to 350°F (175°C). Line a baking sheet with parchment paper. Place the dough balls about 2 inches apart — they spread! Bake for 12-14 minutes or until the edges are golden but the centers are still soft. Let them cool on the baking sheet for 5 minutes before transferring to a wire rack. If you move them too soon, they’ll fall apart — trust me, I’ve been impatient and paid the price.
Cool and Serve
These are best warm, but let them cool enough that you don’t burn your tongue on molten caramel. I like to sprinkle a little flaky sea salt on top right after they come out of the oven — it makes the caramel pop. Serve with cold milk or coffee, or just stand over the counter and eat them straight from the rack like I do.
What to Serve With
A cold glass of milk is the classic choice — the creaminess balances the rich caramel and cheesecake. It’s like a nostalgic after-school snack but way more indulgent.
For a grown-up twist, pair these with a shot of espresso or a latte. The bitterness of the coffee cuts through the sweetness and makes the flavors sing. I once served them at a brunch and people kept going back for “just one more” with their coffee.
If you’re feeling fancy, a scoop of vanilla bean ice cream on the side turns these into a full-on dessert. The contrast of warm cookie and cold ice cream is chef’s kiss.
For a cozy evening, try them with a mug of hot chocolate — especially if it’s salted caramel hot chocolate. It’s over-the-top sweet, but sometimes that’s exactly what you need.
Pro Tips and Variations
Want a little spice? Add 1/2 tsp cinnamon to the cookie dough. It gives a warm, cozy flavor that’s perfect for fall.
For a vegetarian twist, make sure your caramel sauce is made without animal-derived ingredients — some store-bought ones sneak in butter or cream.
Gluten-free? Swap the all-purpose flour for a 1:1 gluten-free baking blend. I’ve tested this and it works, though the texture is slightly more crumbly.
Hosting guests? Drizzle extra caramel over the warm cookies and sprinkle with chopped pecans or a pinch of flaky salt. It looks bakery-level fancy with minimal effort.
Seasonal variation: Add 1/4 cup pumpkin puree to the cheesecake filling and a pinch of pumpkin pie spice to the dough for a fall version. I made these for Thanksgiving and they disappeared before the pie.
Leftover reinvention: Crumble the cookies over vanilla yogurt or ice cream for a cheesecake-cookie parfait. It’s a great way to use up any that go stale (though in my house that never happens).
For more on gluten-free baking, check out this Gluten-free diet resource for ingredient tips.
Storing and Reheating
Store these in an airtight container in the fridge for up to 5 days. The cheesecake filling means they need to be chilled, unlike regular cookies.
To freeze, place the baked cookies in a single layer on a baking sheet until solid, then transfer to a freezer bag. They’ll keep for up to 2 months. I once forgot a batch in the freezer for 3 months and they were still good — just a bit drier.
Reheat in the microwave for 10-15 seconds to get that gooey center back. Don’t overdo it or the caramel will turn into lava. I learned this when I zapped one for 30 seconds and ended up with a molten mess all over my plate.
The cookie part holds up well, but the cheesecake center can get a bit dense after a few days. They’re still delicious, just not quite as magical as fresh.
Customizations for Special Diets
For gluten-free, use a certified gluten-free flour blend and check that your caramel sauce is gluten-free. Some brands sneak in wheat for texture.
Dairy-free? Use vegan butter, dairy-free cream cheese, and coconut cream-based caramel. The texture will be slightly different but still tasty.
Low-fat? You can use reduced-fat cream cheese, but the filling won’t be as rich. I tried this once for a “healthier” batch and they were fine, just less indulgent.
High-protein? Add a scoop of vanilla protein powder to the cookie dough and reduce the flour by 1/4 cup. It changes the texture a bit but works in a pinch.
Common Mistakes to Avoid
Overfilling the cookies is a rookie mistake. I’ve done it — the filling leaks out and you end up with caramel puddles instead of neat cookies. Use just a teaspoon of filling and be conservative with the caramel.
Not chilling the cheesecake filling makes it too soft to handle. If it’s warm, it’ll ooze out during assembly and baking. Always give it at least 20 minutes in the fridge.
Skipping the parchment paper is asking for trouble. These cookies are sticky, and without parchment you’ll be chiseling them off the baking sheet. I learned this when I ran out of parchment and used foil — disaster.
Overbaking is the fastest way to ruin them. They should be just golden at the edges and still soft in the center. They’ll firm up as they cool, so don’t wait until they look “done” in the oven.
Using cold cream cheese for the filling is a texture killer. Lumps in your cheesecake filling are not cute. Always let it soften properly — I leave mine out for at least an hour.
Frequently Asked Questions
Can I make the dough ahead of time?
Yes! You can refrigerate the dough for up to 2 days or freeze it for up to a month. Just let it thaw in the fridge before assembling and baking.
Why did my cookies spread too much?
Either your butter was too soft or you didn’t chill the dough long enough. Try chilling the assembled cookies for 15 minutes before baking if they’re spreading too much.
Can I use store-bought caramel dip instead of sauce?
You can, but make sure it’s thick enough. Some dips are too runny and will leak. I’ve had success with thicker caramel dips meant for apple dipping.
How do I know when they’re done?
The edges should be lightly golden and the centers should look just set but still soft. They’ll continue cooking on the baking sheet after you take them out.
Can I make these without the cheesecake filling?
Sure! You’ll have caramel-stuffed cookies instead. Just skip the cream cheese step and stuff with caramel only. They’re still delicious, just less decadent.
Troubleshooting
| Problem | Cause | Solution |
| :— | :— | :— |
| Cookies spread too thin | Butter too soft, dough not chilled | Chill dough 30 minutes before baking |
| Filling leaks out | Overfilled or filling too warm | Use less filling, chill filling before use |
| Cookies are tough | Overmixed dough | Mix just until combined |
| Caramel hardens too much | Used hard candy caramel | Use soft, pourable caramel sauce |
| Cookies stick to pan | No parchment, overbaked | Always use parchment, don’t overbake |
Final Thoughts
These Caramel Cheesecake Cookies are one of those recipes that makes me feel like a kitchen wizard, even though they’re really quite simple. The first time I made them, I was convinced I’d messed them up — the dough was sticky, the filling was messy, and I definitely got caramel on my phone while texting my sister a photo. But when they came out of the oven, golden and gooey, I knew I’d stumbled onto something special. They’ve become my go-to when I want to bake something that feels fancy but doesn’t require a pastry degree. If you make them, I’d love to hear how they turned out — did you stick to the recipe or go rogue with a twist? And most importantly, did you eat them warm with a cold glass of milk like I do?
Caramel Cheesecake Cookies That Melted My Heart (and My Baking Tray)
Ingredients
- 115g unsalted butter, softened — because salted butter makes these too salty, weirdly
- 100g caster sugar — fine sugar, not the gritty kind
- 50g brown sugar — for that caramel undertone
- 120g full-fat cream cheese — the block kind, not the spreadable tub
- 1 large egg — room temp if you remember, cold if you don’t
- 1 tsp vanilla extract — the real stuff, not the fake vanilla essence
- 180g plain flour — sifted if you’re feeling fancy
- 1/2 tsp baking powder — make sure it’s not ancient
- 1/4 tsp salt — just a pinch to balance the sweetness
- 100g caramel bits — or chop up soft caramels if you can’t find bits
- Optional: extra caramel for drizzling — because why not go overboard
Instructions
- Beat the butter and both sugars together until pale and fluffy — this takes longer than you think, so put on a song and don’t rush it.
- Add the cream cheese and beat again until smooth — if it looks a bit curdled, that’s fine, it’ll sort itself out.
- Mix in the egg and vanilla until just combined — don’t overmix or the cookies get tough.
- Sift in the flour, baking powder, and salt. Stir gently until no dry patches remain — I use a spatula for this bit so I don’t overwork it.
- Fold in the caramel bits — try not to eat half the bag like I always do.
- Cover the bowl and chill the dough for at least 30 minutes — I know it’s annoying, but it stops the cookies from spreading into one giant pancake.
- Preheat the oven to 180°C (160°C fan) and line two trays with parchment paper — don’t skip this unless you enjoy chiseling cookies off trays.
- Scoop heaped tablespoons of dough onto the trays, leaving space between each — they spread more than you expect.
- Bake for 12-14 minutes until the edges are golden but the centres still look soft — they’ll firm up as they cool.
- Let them sit on the tray for 5 minutes before moving to a wire rack — if you try to move them too soon, they’ll fall apart and you’ll have to eat the evidence.
- Drizzle with extra caramel if you’re feeling extra — I always am.