Cheesy Scalloped Potatoes
Table of Contents
You know that smell, right? The one that starts as a faint whisper of onion hitting warm butter, then grows into a rich, milky promise, and finally erupts into the unmistakable, nutty, glorious scent of cheese browning in the oven. It’s the smell of my grandma’s kitchen on a Sunday, of potlucks where you fight for the corner piece, of pure, unadulterated comfort. It’s the smell of these cheesy scalloped potatoes.
But here’s my not-so-secret confession: for the longest time, mine were a disaster. I’d end up with crunchy potatoes swimming in a broken, greasy sauce, a far cry from the creamy, cohesive dream I was after. I once served a version to a dinner party that was so undercooked, we joked we were having al dente potatoes. Not my finest hour. It took me more tries than I’d like to admit—too-thick slices, rushing the sauce, using the wrong cheese—to finally crack the code. And now? Now this dish is my edible security blanket. It’s what I bring to new neighbors, what I make when the rain won’t stop, and what my family demands at every single holiday gathering. It’s deceptively simple, but with a few hard-learned tricks, it becomes absolute magic. Let’s make the ultimate, foolproof, soul-warming version together.
Why You’ll Love This Recipe
- It’s the Definition of Comfort Food. Let’s be real. This isn’t a light, steamed side dish. This is a hug on a plate. The creamy sauce, the tender potatoes, the golden-brown cheesy top—it hits every single comfort note. It just makes ya feel good.
- Surprisingly Simple to Master. Once you get the basic rhythm—making a simple sauce, layering, baking—it’s incredibly straightforward. No fancy techniques required. I promise, my early failures were just me overcomplicating things. This recipe strips it all back to the essentials.
- The Ultimate Crowd-Pleaser. I have never, ever brought a dish of these to a gathering and taken any home. They vanish. Picky kids, foodie friends, grandpas who “don’t like fancy food”—they all go back for seconds. It’s the great unifier.
- Cost-Effective & Pantry-Friendly. Potatoes, milk, butter, flour, cheese. That’s the heart of it. It’s a magnificent way to feed a bunch of people without stressing the grocery budget. You can dress it up, but at its core, it’s humble and honest.
- Leftovers are a Gift. Honestly, I sometimes look forward to the leftovers more. The flavors meld and deepen overnight in the fridge. Reheating a square for lunch feels like a decadent treat you made just for yourself.
Ingredients for Cheesy Scalloped Potatoes
Gathering your stuff before you start is key here (trust me, scrambling for the flour while your butter browns is a path to panic). Here’s what you’ll need, and my two cents on each:
For the Potato Layers:
- 3 pounds Russet potatoes (about 4-5 large ones) – Russets are starchier and soak up the sauce like a dream, giving you that perfect creamy texture. I’ve tried waxy potatoes and… oops. They just don’t break down the same way.
- 1 medium yellow onion, thinly sliced – This adds a sweet, savory backbone. Don’t skip it.
For the Cheesy Sauce (aka the Lifeline):
- 4 tablespoons unsalted butter – This is the flavor base. Salted can work in a pinch, but then just ease up on the added salt later.
- 1/4 cup all-purpose flour – This is our thickener. It’ll make a paste with the butter called a roux, which is the secret to a sauce that coats instead of pools.
- 2 1/2 cups whole milk – Please, for the love of creamy textures, use whole milk. The fat content matters for a lush, unbroken sauce. I tried 2% once and it just felt… sad.
- 1 cup broth (vegetable or chicken) – This adds a layer of savory depth that milk alone can’t provide. It’s a game-changer.
- 2 teaspoons kosher salt, plus more for seasoning
- 1/2 teaspoon black pepper
- 1/4 teaspoon freshly grated nutmeg – Sounds fancy, but it’s a classic, warm note that cuts the richness perfectly. Just a whisper!
For the Cheesy Glory:
- 2 cups freshly shredded sharp cheddar cheese (about 8 ounces) – BUY A BLOCK AND SHRED IT YOURSELF. The pre-shredded stuff is coated to prevent clumping, which also prevents it from melting into a smooth sauce. This is my biggest tip. Sharp cheddar has the flavor punch.
- 1/2 cup freshly shredded Gruyère cheese (about 2 ounces) – This is the “fancy” upgrade. It melts like a dream and adds a slightly nutty, complex flavor. If you can’t find it, all extra-sharp cheddar works, but Gruyère is magic.
For the Topping:
- A little extra shredded cheese for the top, because why not?
- A sprinkle of paprika or a few pats of butter on the top layer for color.
Step-by-Step Instructions
1. Prep is Everything.
First, preheat your oven to 375°F (190°C). Grab a 9×13 inch baking dish and butter it lightly. This feels old-fashioned, but it helps with browning and cleanup.
Now, the potatoes. Peel them. I’ve left skins on for a rustic version, but for classic scalloped, peeled is the way. Here’s the crucial part: slice them evenly, about 1/8-inch thick. A mandoline slicer makes this fast and uniform (watch your fingers! I’ve donated a bit of skin to this cause). If you’re using a knife, just take your time. Uneven slices mean some are mush while others are crunchy. Place all the slices in a big bowl of cold water as you go. This washes off excess starch and prevents them from turning an unappetizing pinkish-gray.
2. Build Your Flavor Base.
In a medium saucepan, melt the 4 tablespoons of butter over medium heat. Once it’s foaming, add all of the thinly sliced onion. Cook, stirring pretty often, for about 5-7 minutes until the onions are soft and translucent. You’re not looking for color here, just tenderness. This step sweetens them and takes the raw bite out.
3. Make the Roux & Sauce.
Sprinkle the 1/4 cup of flour over the softened onions and butter. Stir constantly for a full 1-2 minutes. You’re cooking the raw taste out of the flour, and it’ll look like a thick paste. This is your roux. Now, slowly start pouring in the milk while whisking non-stop. I mean it—don’t stop whisking! This prevents lumps. Once the milk is incorporated, whisk in the broth. Keep whisking until the mixture is smooth and begins to thicken. This takes about 5-7 minutes. You’ll feel it get heavier on the whisk. Now, take it off the heat and stir in the 2 tsp salt, pepper, and that whisper of nutmeg. Taste it! The sauce should be seasoned well at this point. It’ll thicken more in the oven, so don’t worry if it’s not super dense.
4. The Layering Ritual.
Drain your potato slices and pat them dry with a clean kitchen towel. A bit of moisture is fine, but you don’t want them sopping wet. Spread a thin layer of the sauce (just a few spoonfuls) on the bottom of your buttered dish. Now, layer half of the potato slices, overlapping them like shingles. Pour half of the remaining sauce over them, and use a spoon to gently spread it and get it into the cracks. Sprinkle with one cup of the shredded cheddar and all of the Gruyère.
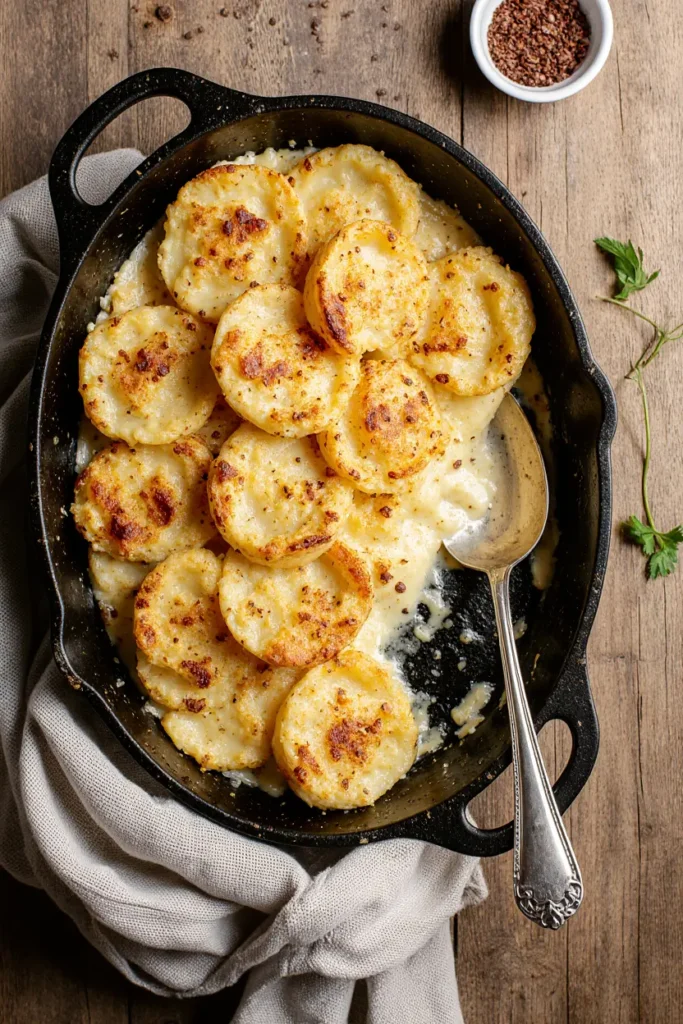
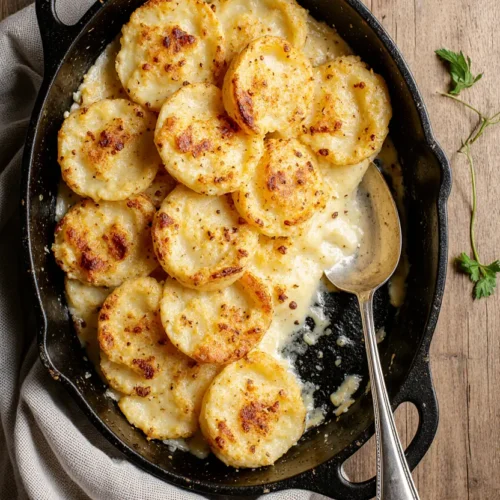
Repeat with the final layer of potatoes and the rest of the sauce. Top with the remaining 1 cup of cheddar and a little extra if you’re feeling wild. For a gorgeous finish, dot the top with a few tiny bits of butter or a light dusting of paprika.
5. Bake to Bubbly Perfection.
Cover the dish tightly with aluminum foil. This is essential—it traps steam to cook the potatoes through without over-browning the top. Bake for 40 minutes. Then, carefully remove the foil (steam burns, ahh!). Return the dish to the oven, uncovered, for another 25-35 minutes. You’re looking for the potatoes to be tender when pierced with a knife, the sauce to be bubbling vigorously around the edges, and the top to be a gorgeous, spotty golden brown. If the top isn’t browned to your liking, you can pop it under the broiler for a minute or two—but watch it like a hawk! Let it rest for 15 minutes before serving. I know, it’s torture. But this rest time lets the sauce set just enough so you get perfect slices instead of a saucy slide.
What to Serve It With
This is the ultimate supporting actor that often steals the show. It pairs with almost anything! My favorite combos:
- The Classic: Alongside a baked ham or a juicy roasted chicken. The creaminess cuts through the savory meat perfectly.
- The Cozy Night: With a simple green apple and walnut salad dressed in a tangy vinaigrette to balance the richness. A glass of sparkling cider or a crisp white grape juice completes the vibe.
- The Hearty Feast: As part of a holiday spread with green bean casserole, rolls, and cranberry sauce. It just belongs there.
- The “I Just Want Carbs” Dinner: Honestly? A big plate of these, a side of roasted broccoli, and a good movie. That’s a perfect Tuesday.
Pro Tips & Variations
- Herb It Up: Add a teaspoon of fresh thyme leaves between layers, or a tablespoon of chopped fresh rosemary in the sauce.
- Garlic Lover’s Twist: Add 2-3 minced garlic cloves to the onions when they’re almost soft.
- Make it a Main Dish: Stir in a couple cups of diced leftover cooked turkey or a plant-based protein alternative between the layers for a complete casserole.
- Spice it Subtly: A dash of cayenne pepper or smoked paprika in the sauce adds a warm, subtle kick.
Storage and Reheating Tips
Fridge: Let leftovers cool completely, then cover tightly or transfer to an airtight container. They’ll keep for 3-4 days.
Reheating: The microwave can make the sauce a bit grainy. The best method is to reheat portions in a covered oven-safe dish at 350°F until warmed through (about 15-20 minutes). Add a tiny splash of milk or broth to keep it moist. You can also reheat gently in a covered skillet on the stovetop over low heat.
Freezer: You can freeze it for up to 2 months. Thaw overnight in the fridge before reheating using the oven method above. The texture of the potatoes might be a touch softer, but the flavor will still be great.
Frequently Asked Questions
Can I make this ahead of time?
Absolutely! Assemble the entire dish, cover, and refrigerate for up to 24 hours before baking. You may need to add 10-15 minutes to the baking time since it’s starting cold.
Why are my potatoes still hard?
The slices are likely too thick, or the oven temp was too high, causing the top to brown before the inside cooked. Ensure slices are 1/8-inch thick, and don’t skip the foil-covered baking time—that’s the steaming phase that cooks them through.
My sauce seems thin/watery. What happened?
This usually means the roux wasn’t cooked long enough, the flour measurement was off, or the potatoes weren’t patted dry, adding extra water. Let the finished dish rest the full 15 minutes; the sauce will thicken as it sits.
Can I use pre-shredded cheese?
You can, but the sauce won’t be as smooth and velvety due to the anti-caking agents. For the best texture and melt, block cheese is the way.
Customizations for Special Diets
- Gluten-Free: Substitute the all-purpose flour with an equal amount of a gluten-free 1:1 baking flour blend. The roux will work just the same.
- Vegetarian: Use a robust vegetable broth to build the sauce.
- Lighter Version: You can use lower-fat milk and reduced-fat cheese, though the texture and richness will be less decadent. For more on lower-fat approaches, you can read about low-fat diet principles.
Common Mistakes to Avoid
- Skipping the Roux Cook-Time: Cooking the flour in the butter for a full minute removes the raw taste and is key for proper thickening.
- Using Pre-Shredded Cheese: It seems easier, but it’s the main culprit for a gritty, non-creamy sauce.
- Not Letting it Rest: Cutting in too soon leads to a soupy plate. The rest time is non-negotiable for perfect slices.
- Underseasoning the Sauce: The potatoes absorb a lot of flavor. Your sauce should taste boldly seasoned on its own.
Troubleshooting Guide
| Problem | Likely Cause | Solution |
|---|---|---|
| Crunchy, undercooked potatoes | Slices too thick, oven temp too high, baking time too short. | Ensure 1/8-inch slices, bake covered until tender, then uncover to brown. |
| Watery, separated sauce | Potatoes added wet, roux not cooked properly, dish cut too soon. | Pat potatoes dry, cook roux 1-2 min, let dish rest 15 min before serving. |
| Sauce is too thick/gluey | Too much flour, over-reduced sauce. | Follow flour measure, sauce should coat spoon but be pourable before baking. |
| Top browned too quickly | Oven rack too high, baking uncovered too long. | Place dish in center rack, ensure it’s covered with foil for first 40 min. |
| Cheese topping is greasy | Using pre-shredded cheese or cheese with low melt quality. | Shred cheese from a block, use a blend like cheddar and Gruyère. |
Final Thoughts
At the end of the day, this recipe is more than just potatoes and cheese. It’s about the messy, beautiful process of creating something that nourishes more than just your body. It’s about the patience to slice the potatoes evenly, the rhythm of whisking the sauce, the anticipation as that incredible smell fills your house, and the shared silence of everyone taking that first, perfect bite.
It’s the dish I make when I want to say “I’m glad you’re here” without using words. So, I really hope you try it. Make your own mess, learn your own lessons in the kitchen, and make it yours. Maybe you’ll add a different herb, or use smoked cheese, or finally nail that golden-brown top. However it turns out, you made it.
And I have to ask… what’s your ultimate comfort food? The one dish that, no matter what, just makes everything feel okay?
The Ultimate Cheesy Scalloped Potatoes
Ingredients
For the Potato Layers:
- 3 pounds Russet potatoes peeled and thinly sliced {1.36 kg}
- 1 medium yellow onion thinly sliced
For the Cheesy Sauce:
- 4 tablespoons unsalted butter {57 grams}
- 1/4 cup all-purpose flour {30 grams}
- 2 1/2 cups whole milk {590 ml}
- 1 cup vegetable or chicken broth {240 ml}
- 2 teaspoons kosher salt
- 1/2 teaspoon black pepper
- 1/4 teaspoon freshly grated nutmeg
For Assembly:
- 2 cups freshly shredded sharp cheddar cheese {8 oz / 225 grams}
- 1/2 cup freshly shredded Gruyère cheese {2 oz / 55 grams}