Air Fryer Honey Butter Garlic Chicken Tenders
Table of Contents
Okay, I have a confession to make. For years, I was completely, utterly loyal to my cast iron skillet when it came to making chicken tenders. I thought that was the only path to true crispy perfection. That is, until a chaotic Tuesday evening when my toddler was literally hanging onto my leg, the dog was barking at a squirrel, and I realized I had forgotten to preheat the oven for the roasted veggies. Desperation is the mother of invention, or in this case, the gateway to a major kitchen revelation. I tossed some frozen tenders (yes, frozen! No shame!) into the air fryer as a last-ditch effort, and what emerged… changed everything. They were impossibly crispy, cooked in a fraction of the time, and my kitchen stayed cool. It was a miracle.
But then I got greedy. I wanted more than just crispy. I wanted sticky, sweet, savory, and downright irresistible. I started playing around with a glaze, something simple but transformative. The result is this Air Fryer Honey Butter Garlic Chicken Tenders recipe. It’s the glorious love child of your favorite takeout honey garlic chicken and the most comforting homemade chicken tender. They’re family-devouring-in-minutes good, weeknight-savior easy, and the kind of messy-finger-licking food that just makes you feel happy. Honestly, if I could marry a sauce, this honey butter garlic situation would be the one. It’s that good.

Why You’ll Fall Head Over Heels for These Tenders
Let’s be real, we all need a hero recipe in our back pocket. This is it.
- The Crispy-to-Sticky Ratio is Perfection: The air fryer gives you that incredible, crunchy exterior without deep frying, and the quick toss in the warm honey butter garlic sauce creates this gorgeous, glossy, sticky-sweet shell. Every bite is a textural dream.
- It’s a 20-Minute Miracle: From freezer (or fridge) to table in under half an hour. The air fryer cooks the chicken fast and perfectly, and the sauce comes together in the time it takes the tenders to crisp up. It’s the ultimate “I have no time but I want something amazing” dinner.
- Kid-Approved & Adult-Approved Magic: This is the rare dish that bridges the gap. The sweet garlicky glaze wins over the pickiest little eaters (just maybe call it “honey chicken”), while the savory depth and perfect crispness keeps the grown-ups reaching for more. No more making separate meals!
- Minimal Mess, Maximum Reward: One bowl for dredging, one small pot for the sauce, and the air fryer basket. That’s it. The cleanup is almost as satisfying as eating them. I’ve made these on nights when doing a single extra dish felt like a Herculean task, and it was still totally doable.
- Meal-Prep & Leftover Gold: These reheat shockingly well in the air fryer, regaining their crispness. You can also cook a big batch of the plain air-fried tenders and sauce them as needed throughout the week for quick wraps, salads, or lunches.
Ingredients for Your New Favorite Dinner
This is all about simple ingredients doing extraordinary things. Here’s what you’ll need, with my very strong personal opinions attached.
For the Crispy Air Fryer Tenders:
- 1.5 pounds chicken tenders (or boneless, skinless chicken breasts, sliced into strips) {680 grams}
- 1 cup all-purpose flour {120 grams} (See notes for a gluten-free swap!)
- 2 teaspoons garlic powder {6 grams}
- 2 teaspoons paprika {5 grams} (Smoked paprika is incredible here if you have it)
- 1 teaspoon salt {6 grams}
- ½ teaspoon black pepper {1 gram}
- 2 large eggs, beaten
- 1 cup panko breadcrumbs {50 grams} (This is the CRISPY secret. Don’t skip!)
For the Legendary Honey Butter Garlic Glaze:
- ⅓ cup honey {80 ml} (Use a good, flavorful one!)
- 4 tablespoons unsalted butter {57 grams}
- 4-5 large garlic cloves, minced (About 2 tablespoons. MORE is always better, to be real.)
- 2 tablespoons soy sauce {30 ml} (Low-sodium is fine)
- 1 tablespoon fresh lemon juice or rice vinegar {15 ml} (This little acid cuts the sweetness perfectly)
- Pinch of red pepper flakes (Optional, but a little heat is so good)
For Serving (The Fun Part):
- Chopped fresh parsley or green onions
- Extra lemon wedges for squeezing
Step-by-Step Instructions: Let’s Get Sticky
This process is straightforward, but I’ve learned a few tricks the hard way so you don’t have to. Follow along!
1. Set Up Your Dredging Station.
This is key for efficiency. Get three shallow bowls or plates. In the first one, whisk together the flour, garlic powder, paprika, salt, and pepper. In the second, beat the two eggs until uniform. In the third, pour out the panko breadcrumbs. Line them up: flour, egg, panko. This is your assembly line. I also recommend placing a wire rack on a baking sheet to hold your coated tenders—this keeps them from getting soggy on the bottom.
2. Dredge Like a Pro.
Pat your chicken tenders completely dry with paper towels. This is non-negotiable for the coating to stick! Take one tender and dredge it fully in the flour mixture, shaking off any excess. Then, dip it into the egg, letting the excess drip off. Finally, press it firmly into the panko breadcrumbs, coating all sides. You want a good, solid crust. Place it on the wire rack. Repeat with all tenders. Don’t crowd them on the rack.
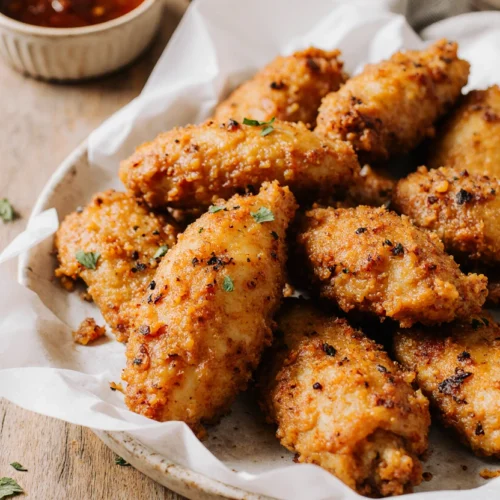
3. Air Fry to Crispy Glory.
Preheat your air fryer to 400°F (200°C) for about 3 minutes. Lightly spray the basket with oil. Arrange the tenders in a single layer, making sure they aren’t touching. You’ll likely need to cook in batches—it’s worth it for the crisp! Lightly spray the tops of the tenders with oil (this helps them brown). Air fry for 7-9 minutes, flip them over, spray the other side lightly, and cook for another 5-7 minutes, until the coating is deep golden brown and the chicken is cooked through (internal temp of 165°F / 74°C). The time can vary a bit based on your air fryer model and the size of your tenders.
4. Create the Glaze (The Best Part).
While the chicken cooks, make the magic. In a small saucepan over medium-low heat, melt the butter. Add the minced garlic and a pinch of red pepper flakes (if using). Cook for just 1 minute until fragrant—DO NOT let the garlic brown or it’ll turn bitter. Oops, learned that one the hard way. Whisk in the honey, soy sauce, and lemon juice. Let it simmer gently for 2-3 minutes until it thickens slightly into a beautiful, glossy sauce. Remove from heat.
5. The Grand Finale: Sauce & Serve.
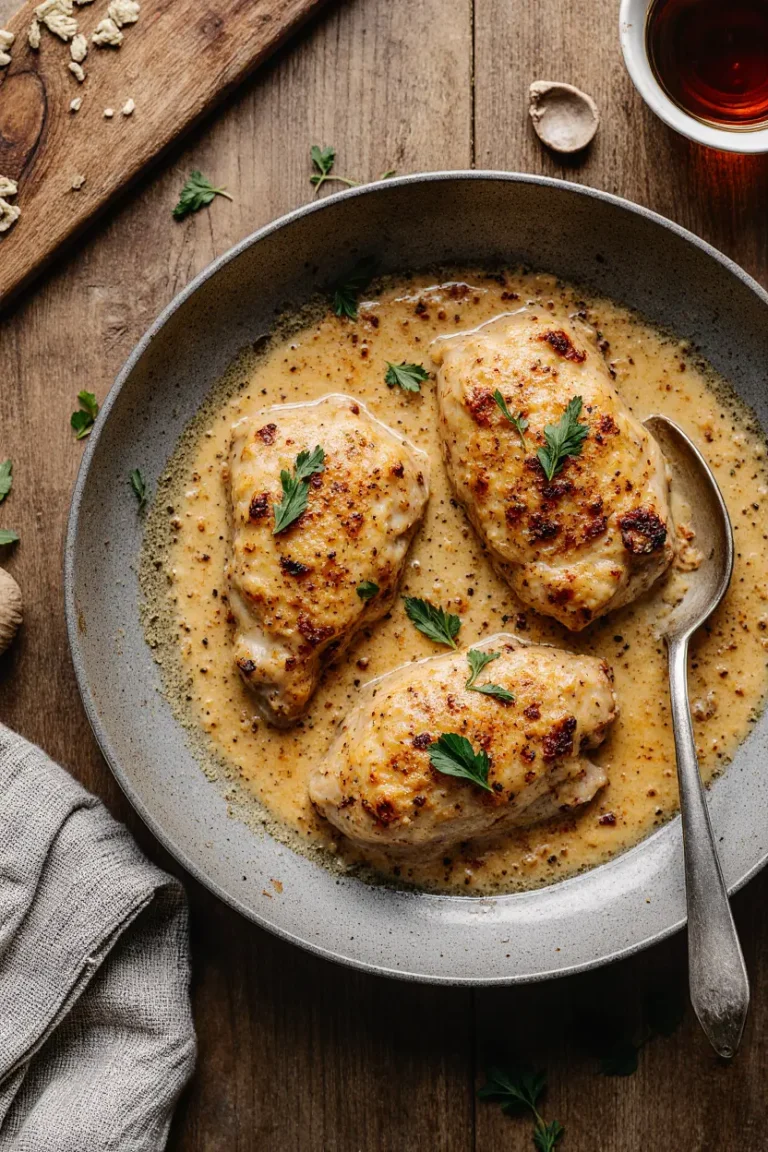
As soon as your last batch of tenders is done and still piping hot, place them all in a large bowl. Pour the warm honey butter garlic glaze over the top. Using tongs or a big spoon, gently toss until every single tender is gloriously coated. Don’t be shy. Transfer to a platter, sprinkle with chopped parsley or green onions for a fresh pop, and serve immediately with lemon wedges. Prepare for silence at the dinner table, broken only by the sound of happy chewing.
What to Serve With Your Masterpiece
These tenders are the star, so keep the sides simple and cool to balance the sticky richness.
- The Classic Combo: A big, crisp green salad and some creamy potato salad or coleslaw. The cool crunch is the perfect contrast.
- For a Cozier Meal: Pile them on top of a mound of fluffy white rice or mashed potatoes. The sauce drizzling down over the carbs is… chef’s kiss.
- The Ultimate Dipper: Don’t waste a drop of that extra sauce on the platter! Serve with soft, warm rolls or breadsticks for dipping. It’s a requirement in my house.
Pro Tips & Variations from My Kitchen to Yours
- Gluten-Free? No problem! Use a 1:1 gluten-free flour blend (like Bob’s Red Mill) and certified gluten-free panko breadcrumbs. The soy sauce must be swapped for tamari or coconut aminos.
- Spice It Up: Add ½ teaspoon of sriracha or a dash of cayenne pepper to the glaze for a sweet-heat vibe.
- Herbaceous Twist: Stir a tablespoon of fresh chopped thyme or rosemary into the glaze right at the end for an earthy note.
- Make Them “Naked”: The air-fried, unsauced tenders are fantastic on their own with ketchup, BBQ sauce, or ranch. They’re a perfect blank canvas for picky eaters.
- The Double-Dip: For an EXTRA crispy, craggy coating, do a double dredge: flour, egg, panko, then BACK into the egg, and back into the panko again. It’s a bit messier, but oh my, the crunch.
Storing and Reheating the Evidence
- Fridge: Store leftover sauced tenders in an airtight container for up to 3 days. They will lose some crispness but the flavor will still be fantastic.
- Freezer: Freeze UN-sauced, cooked tenders on a parchment-lined sheet, then transfer to a freezer bag for up to 2 months. Reheat from frozen in the air fryer.
- Reheating for Best Results: To regain crispness, always reheat in the air fryer at 375°F (190°C) for 3-5 minutes. The microwave will make them soggy—trust me, I’ve made that sad mistake.
Frequently Asked Questions
Can I use frozen chicken tenders?
Yes! For best results, use the “frozen” setting on your air fryer according to its instructions, or thaw them completely first and pat VERY dry before dredging. The coating won’t stick to wet or icy chicken.
My glaze is too thin. How do I thicken it?
Let it simmer a minute or two longer. You can also make a quick slurry with ½ teaspoon of cornstarch mixed with 1 teaspoon of water and whisk it into the simmering sauce for 30 seconds.
Can I bake these instead?
Absolutely. Bake on a wire rack set over a baking sheet at 400°F (200°C) for 15-20 minutes, flipping halfway, until cooked through. Then toss in the glaze.
The panko isn’t sticking well! What did I do wrong?
You likely didn’t shake off the excess flour or let the excess egg drip off. The coating needs a thin, even layer at each stage to act as proper glue. Also, pressing firmly in the panko is key.
Final Thoughts
This recipe is my go-to for so many reasons. It’s the dinner I make when I’m tired but still want to feel like I cooked something special. It’s the meal that makes my family gather in the kitchen, stealing pieces straight from the bowl before I can even get it to the table. It’s proof that with a few simple ingredients and a trusty air fryer, you can create something that feels like a treat, any night of the week.
It’s not fussy. It’s forgiving. And it always, always delivers that perfect combination of crispy, sticky, sweet, and savory that just hits the spot. So go ahead, get your fingers a little messy, and give it a try. I have a feeling this might just become your new kitchen hero, too.
What’s your favorite dipping sauce for tenders? Be honest—do you go for ranch, honey mustard, or something else entirely?
Air Fryer Honey Butter Garlic Chicken Tenders
Ingredients
For the Chicken & Breading:
- 1.5 pounds chicken tenders or boneless, skinless chicken breasts, sliced into strips {680 grams}
- 1 cup all-purpose flour {120 grams}
- 2 teaspoons garlic powder {6 grams}
- 2 teaspoons paprika {5 grams}
- 1 teaspoon salt {6 grams}
- ½ teaspoon black pepper {1 gram}
- 2 large eggs beaten
- 1 cup panko breadcrumbs {50 grams}
For the Honey Butter Garlic Glaze:
- ⅓ cup honey {80 ml}
- 4 tablespoons unsalted butter {57 grams}
- 4-5 large garlic cloves minced (about 2 tablespoons) {20 grams}
- 2 tablespoons soy sauce {30 ml}
- 1 tablespoon fresh lemon juice {15 ml}
- Pinch of red pepper flakes optional
Instructions
Step 1: Prepare Dredging Station
- In three separate shallow dishes, set up your breading station. In the first, whisk together flour, garlic powder, paprika, salt, and pepper. In the second, beat the eggs. Place the panko breadcrumbs in the third.
Step 2: Bread the Chicken
- Pat chicken tenders completely dry with paper towels. Dredge each tender first in the flour mixture, shaking off excess. Then dip into the beaten egg, allowing excess to drip off. Finally, press firmly into the panko breadcrumbs to coat all sides. Place on a wire rack.
Step 3: Air Fry the Tenders
- Preheat air fryer to 400°F (200°C). Lightly spray the basket with oil. Place tenders in a single layer without touching (cook in batches if needed). Lightly spray tops with oil. Air fry for 7-9 minutes, flip, spray lightly again, and cook for another 5-7 minutes until golden brown and internal temperature reaches 165°F (74°C).
Step 4: Make the Glaze
- While chicken cooks, melt butter in a small saucepan over medium-low heat. Add minced garlic and red pepper flakes; cook for 1 minute until fragrant. Whisk in honey, soy sauce, and lemon juice. Simmer for 2-3 minutes until slightly thickened.
Step 5: Coat and Serve
- Place hot, cooked chicken tenders in a large bowl. Pour the warm honey butter garlic glaze over them. Gently toss until evenly coated. Serve immediately, garnished with chopped parsley if desired.