No-Bake Easy Cherry Chocolate Chip Pie
Table of Contents
Okay, let’s set the scene. It’s last July, the heat is sweltering enough to fry an egg on the patio, and my air conditioner is making a sound that can only be described as a dying robot. The last thing on earth I wanted to do was turn on my oven. But. A certain small human in my house (my niece, who was visiting for a week of “fun Auntie time”) had gotten it into her head that we simply had to make a pie. A cherry pie, to be specific. Her eyes were wide, her hopes were high, and my kitchen was approximately 90 degrees Fahrenheit.
I panicked. My pie crust skills are… let’s call them rustic. And baking in that heat? No thank you. So I did what any resourceful, slightly sweaty aunt would do: I lied. “Sweetheart,” I said, wiping my brow, “we’re going to make a magic pie. A pie that makes itself in the fridge.” Her skepticism was palpable. But an hour later, as we were pressing a buttery crumb crust into a pan and she was “testing” the chocolate chips (a crucial step, obviously), the magic began. What emerged from the fridge a few hours later wasn’t just a pie. It was a creamy, dreamy, bursting-with-juicy-cherries and pockets of chocolate masterpiece. It was cool, it was effortless, and it tasted like a childhood summer I thought I’d forgotten. It was my No-Bake Easy Cherry Chocolate Chip Pie, and it’s been my secret weapon ever since.
This pie is special because it understands you. It understands that sometimes you need a show-stopping dessert without the show-stopping effort. It gets that you might have last-minute guests, a craving that won’t quit, or a kitchen that’s too hot to handle. It’s a family-friendly project (kids love helping with every no-bake step), a potluck superstar, and honestly, it’s just a big, sweet, creamy hug in pie form. If you’ve ever looked longingly at a pie recipe and then closed the tab at the words “chill the dough for an hour,” this is your rebellion. This is your win.

Why You’ll Love This No-Bake Cherry Chocolate Chip Pie
Let’s be real, the list is long, but I’ll try to keep it to the highlights.
- It’s the Ultimate No-Fuss, No-Oven Hero. This is the whole point. From start to finish, you’re looking at about 20 minutes of active, easy work. No rolling pins, no pastry anxiety, no heating up the house. You mix, you press, you whip, you pour, you chill. It’s therapy, but with a pie at the end.
- The Texture Party is Unbeatable. We’re talking about a symphony in your mouth. You’ve got the firm, sandy-sweet crunch of the graham cracker crust. Then, the luscious, cloud-like cream cheese filling. Bursting through that are the tart, juicy cherries, and then—little surprise explosions of rich, dark chocolate. Every bite is different, and every bite is perfect.
- It’s Shockingly Impressive. Here’s a little secret: the easier a dessert is to make, the more people think you’re a culinary wizard. This pie looks like you spent hours. The vibrant red cherries peeking through the snowy white filling, the flecks of dark chocolate… it’s gorgeous. I’ve brought this to more gatherings than I can count, and the “You MADE this?” question never gets old. I just smile and say, “Oh, it was nothing.” (Because it kinda was.)
- It’s a Canvas for Your Creativity. Don’t have chocolate chips? Chop up a chocolate bar. Want a nuttier crust? Use gingersnaps or vanilla wafers. Dreaming of almonds? Add a 1/2 teaspoon of almond extract to the filling. This recipe is wonderfully forgiving and begging for your personal twist.
- It Makes You Feel Like a Kid Again. There’s something deeply joyful and nostalgic about this pie. It tastes like ice cream parlors and summer holidays. It’s unpretentious and purely delicious. Sharing it feels like sharing a piece of pure, simple happiness.
Ingredients for No-Bake Easy Cherry Chocolate Chip Pie
Gather your squad! Here’s everything you’ll need, broken down by component. A quick note: I’m a big believer in using what you love, so feel free to swap brands. This is just what works in my kitchen.
For the Crust:
- 1 ½ cups graham cracker crumbs (about 10-12 full sheets, whizzed in a food processor or bashed in a bag with a rolling pin—very therapeutic)
- ⅓ cup granulated sugar
- 6 tablespoons unsalted butter, melted (if you only have salted butter, that’s fine, just maybe skip the pinch of salt below)
- A tiny pinch of fine sea salt (trust me, it makes the sweet pop)
For the Filling:
- 8 ounces (one brick) full-fat cream cheese, softened to room temperature. This is non-negotiable for smoothness! Leave it on the counter for a good hour.
- 1 cup powdered sugar, sifted if it’s lumpy
- 1 teaspoon pure vanilla extract
- 1 cup heavy cream, cold
- 1 cup mini semi-sweet chocolate chips (I like mini because they distribute better, but regular work too)
For the Cherry Layer:
- 1 can (21 ounces) cherry pie filling. Yes, we’re using the canned stuff! It’s consistent, juicy, and perfect for this. I prefer a brand that isn’t overly sweet, so the tartness shines through.
Step-by-Step Instructions
Alright, friends. Aprons on, maybe a fun playlist on, and let’s make some magic.
Step 1: Make the Crust.
Grab a 9-inch pie plate. In a medium bowl, mix the graham cracker crumbs, the 1/3 cup granulated sugar, and that pinch of salt. Pour the melted butter over the top. Now, get in there with a fork or your hands (I use my hands) and mix until it looks like wet sand and every crumb is coated. It should hold together when you pinch it.
Dump the crumbs into your pie plate. Starting from the center, press them firmly and evenly up the sides and across the bottom. I like to use the bottom of a measuring cup to really tamp it down flat—it helps prevent a crumbly crust later. Once it’s all pressed in, pop the whole plate into the fridge to set up while you make the filling. This is a good time to lick the butter bowl. I won’t tell.
Step 2: Whip Up the Dreamy Filling.
In a large bowl (or the bowl of a stand mixer fitted with the whisk attachment), beat the softened cream cheese on medium speed until it’s completely smooth and creamy, about 1-2 minutes. Scrape down the sides. Add the powdered sugar and vanilla extract. Beat again on low at first (to avoid a sugar cloud), then on medium, until it’s fully combined and smooth. Scrape down the sides again. Honestly, scraping is the secret to no-lump fillings. Transfer this creamy mixture to a separate bowl for a minute. No need to wash the mixer bowl!
Pour the cold heavy cream into that same mixer bowl. Whip it on medium-high speed until stiff peaks form. You want it to be thick and billowy—when you lift the whisk, the peak should stand straight up and not droop. This usually takes 2-4 minutes. Don’t walk away and let it turn to butter! (I’ve done it. It’s a sad, grainy moment.)
Step 3: Bring It All Together.
Now, gently fold the whipped cream into the cream cheese mixture. I like to add the cream in two additions. Use a big spatula and a light hand—you want to keep all that air you just whipped in. Fold until just combined and no white streaks remain. Dump in the mini chocolate chips and fold them in too, just until they’re evenly distributed.
Step 4: Assemble Your Masterpiece.
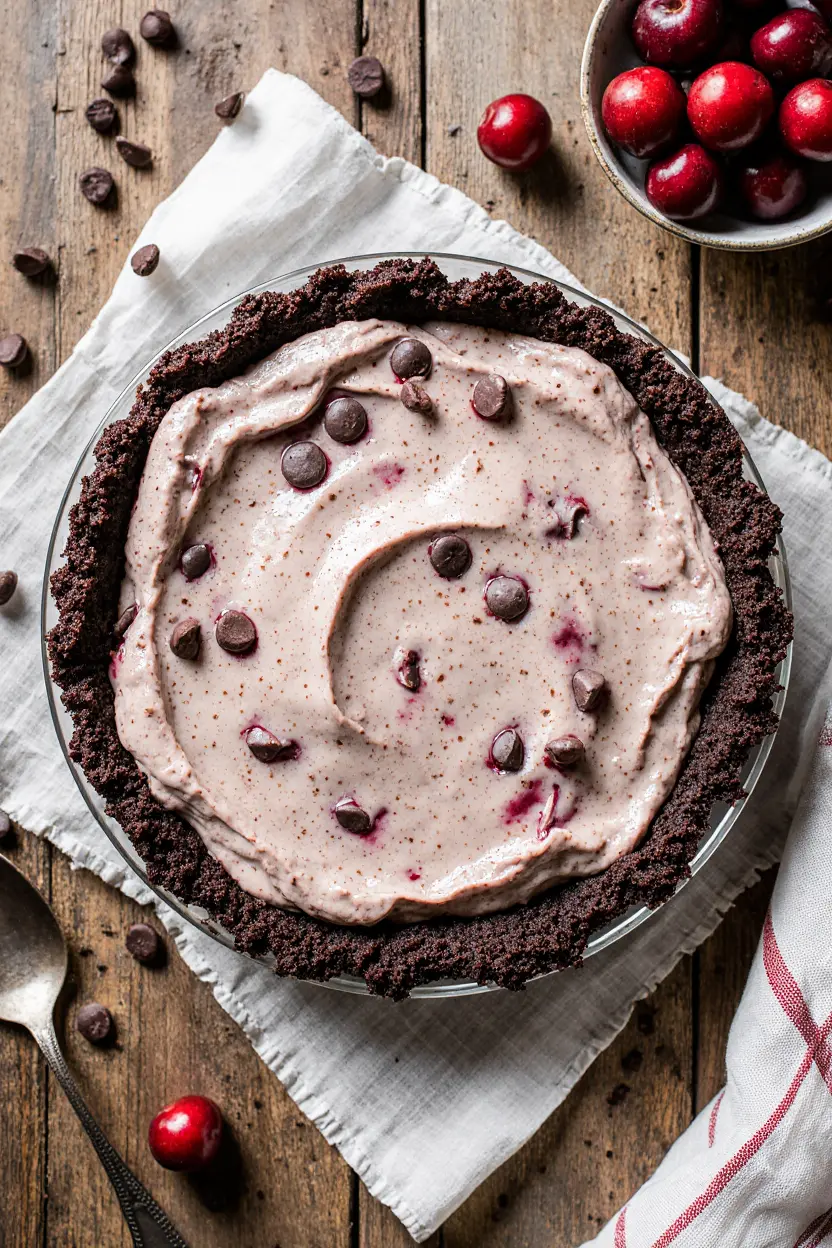
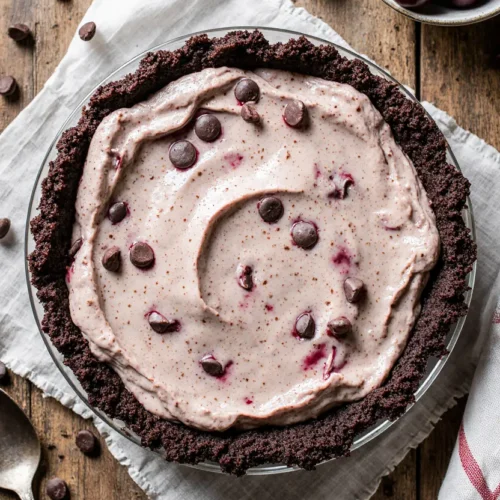
Pull your crust from the fridge. Spread about two-thirds of the creamy filling into the crust, smoothing it into an even layer. Now, take your can of cherry pie filling. Spoon dollops of it over the cream layer. You can spread it gently, but I like leaving some swirls and peaks for visual interest. Finally, carefully dollop and spread the remaining cream filling over the cherries. You can do a pretty swirl, or just cover it all—it’s your pie! I sometimes reserve a few cherries and a sprinkle of chips for the top.
Step 5: The Hardest Part: The Chill.
Cover the pie loosely with plastic wrap or a dome lid. Refrigerate it for at least 4 hours, but oh my goodness, overnight is truly best. This wait is agony, but it’s what transforms the filling from soft to gloriously sliceable. It lets all the flavors get to know each other and become best friends.
What to Serve Your Pie With
This pie is a star all on its own, but a little company never hurts.
- A big mug of strong coffee or a glass of cold milk is the classic, perfect pairing.
- For a decadent brunch spread, it’s amazing alongside something savory like a breakfast casserole .
- If you’re serving it after a big dinner, keep the sides light. A simple, zesty citrus salad cuts through the richness beautifully.
- And let’s be real: a giant extra dollop of lightly sweetened whipped cream on top is never a bad idea.
Top Tips for Perfecting Your Pie
- Cream Cheese Softening is Key: If your cream cheese is even a little cold, you’ll get lumps. If you forgot to take it out, you can microwave it for 10-15 seconds on LOW power. Just don’t let it melt.
- Cold Cream for Whipping: Your heavy cream whips best when it’s ice-cold. I sometimes even chill my mixing bowl and whisk for 10 minutes before starting.
- The Fold, Don’t Stir Rule: When combining the whipped cream and cream cheese, folding maintains the airy texture. Stirring will deflate it and make the filling dense.
- Customize That Crust: Add ¼ cup of finely chopped toasted nuts (like pecans or almonds) to the crumb mixture for extra flavor and crunch.
- Slice Cleanly: For picture-perfect slices, dip your knife in hot water and wipe it clean between each cut.
Storing and Reheating Tips
Reheating? No way! This pie is meant to be eaten cold and glorious.
- Storing: Keep it covered in the refrigerator. It will be at its absolute best for 2-3 days. After that, the crust will start to soften a bit (it’s still delicious, just less crunchy).
- Freezing: You can freeze this pie! Wrap the whole pie (or individual slices) tightly in plastic wrap and then in foil. Freeze for up to 1 month. Thaw overnight in the fridge before serving. The texture of the filling may be slightly less fluffy after freezing, but the flavor will still be fantastic.
Frequently Asked Questions
Can I use fresh cherries instead of pie filling?
You can, but it’s more work. You’d need to pit and cook down about 3 cups of fresh cherries with some sugar and cornstarch to get a similar thick, syrupy consistency. The canned filling is the easy button, and it works incredibly well.
My filling seems too soft after chilling. What happened?
This usually means the cream wasn’t whipped to stiff enough peaks, or the pie didn’t chill long enough. Give it more time! A full 6-8 hours or overnight is ideal.
Can I make this gluten-free?
Absolutely! Just use certified gluten-free graham crackers or gluten-free cookies to make your crumbs. Everything else is naturally gluten-free.
Can I use milk chocolate chips?
Of course! Use whatever chocolate you love. Semi-sweet gives a nice balance, but milk or dark would be wonderful too.
Customizations for Special Diets
- Lower-Sugar: Use a sugar-free or lightly sweetened cherry pie filling if you can find it, and consider reducing the powdered sugar in the filling slightly, tasting as you go. For more on adjusting sweeteners, you can read about unrefined sweeteners.
- Lighter Version: For a lower-fat option, you can use a light cream cheese and swap the heavy cream for a well-chilled full-fat coconut cream (whip it the same way). The texture will be slightly different but still delicious. The principles of a low-fat diet can offer guidance here.
- Dairy-Free: Use dairy-free cream cheese and whippable plant-based heavy cream alternatives. Check your chocolate chips to ensure they’re dairy-free.
Common Mistakes to Avoid
- Using Cold Cream Cheese: Lumpy filling city. Please soften it.
- Under-Whipping the Cream: This leads to a runny pie. Whip until those peaks are stiff and proud.
- Skipping the Long Chill: Impatience leads to soup. Plan ahead for that overnight chill.
- Overmixing the Final Filling: Fold gently to keep it light and fluffy.
Troubleshooting Your Pie
| Issue | Likely Cause | How to Fix It Next Time |
|---|---|---|
| Soggy Crust | The butter wasn’t fully incorporated, or the pie was stored too long. | Press the crust mix firmly, ensure it’s even. Eat within 3 days for best texture. |
| Lumpy Filling | Cream cheese was too cold. | Ensure cream cheese is truly room temperature. If lumps appear, you can try beating the mixture a bit longer, but prevention is best. |
| Runny Filling | Cream not whipped enough, or not chilled long enough. | Whip cream to stiff peaks. Chill pie for minimum 4 hours, ideally overnight. |
| Chocolate Sinking | Filling was too soft when chips were added. | Ensure your cream cheese mixture is thick before folding in whipped cream and chips. |
Final Thoughts
This No-Bake Cherry Chocolate Chip Pie is more than a recipe to me now. It’s the taste of that hot summer day turned sweet, of a kitchen mess shared with someone I love, of realizing that the best solutions are often the simplest ones. It’s my go-to when I need to bring joy, when I need a dessert that feels like a celebration without the stress.
It’s proof that you don’t need fancy skills or a fancy kitchen to make something truly wonderful. You just need a bowl, a whisk, and a little bit of patience while it chills. So I really hope you try it. I hope you make a mess and lick the spoon and share it with people who make you laugh.
And when you do, I’d love to know—how did you make it your own? Did you add a splash of almond? Use a different cookie crust? Tell me everything in the comments below. And hey, what’s your ultimate no-bake, saves-the-day dessert? Be honest—do you eat the leftover cherry filling straight from the can with a spoon, too?
No-Bake Easy Cherry Chocolate Chip Pie
Ingredients
- For the Crust:
- 1 ½ cups graham cracker crumbs {170 grams}
- ⅓ cup granulated sugar {67 grams}
- 6 tablespoons unsalted butter melted {85 grams}
- 1 pinch fine sea salt
- For the Filling:
- 8 ounces full-fat cream cheese softened {226 grams}
- 1 cup powdered sugar sifted if lumpy {120 grams}
- 1 teaspoon pure vanilla extract {5 ml}
- 1 cup heavy cream cold {240 ml}
- 1 cup mini semi-sweet chocolate chips {170 grams}
- For the Topping:
- 1 can 21 ounces cherry pie filling {595 grams}
Instructions
- Make the Crust:
- In a medium bowl, combine graham cracker crumbs, granulated sugar, and a pinch of salt.
- Pour the melted butter over the crumbs and mix with a fork or your hands until the mixture resembles wet sand and holds together when pinched.
- Press the mixture firmly and evenly into the bottom and up the sides of a 9-inch pie plate. Use the bottom of a measuring cup to help compact it.
- Place the crust in the refrigerator to chill while you prepare the filling.
- Prepare the Filling:
- In a large mixing bowl, beat the softened cream cheese with an electric mixer on medium speed until completely smooth, about 1-2 minutes.
- Add the powdered sugar and vanilla extract. Beat on low speed initially, then increase to medium until fully combined and smooth. Scrape down the sides of the bowl as needed. Set this mixture aside.
- In a separate clean bowl (or the bowl of a stand mixer), pour the cold heavy cream. Whip on medium-high speed until stiff peaks form, about 2-4 minutes. The cream should be thick and billowy.
- Combine and Assemble:
- Gently fold the whipped cream into the cream cheese mixture in two additions. Use a large spatula and a light hand to maintain the airy texture.
- Fold in the mini chocolate chips until evenly distributed.
- Remove the chilled crust from the refrigerator. Spread about two-thirds of the cream filling into the crust in an even layer.
- Spoon the cherry pie filling over the cream layer, spreading it gently or leaving it in dollops.
- Carefully spread or dollop the remaining cream filling over the cherries. You can create a swirled design or cover the cherries completely.
- Chill to Set:
- Cover the pie loosely with plastic wrap or a lid. Refrigerate for at least 4 hours, but ideally overnight, to allow the filling to set completely and the flavors to meld.