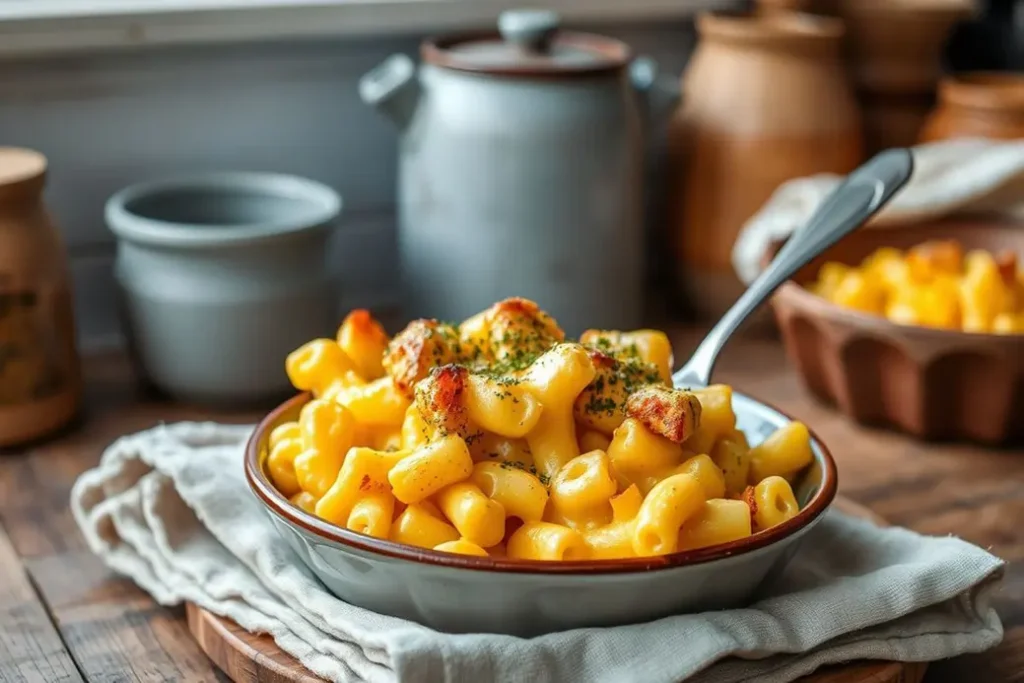
Better-Than-Takeout Baked Mac and Cheese
Table of Contents
I still remember the first time I made Baked Mac and Cheese from scratch — my kitchen was a disaster zone. Flour everywhere, milk boiling over like it had a vendetta, and me standing there with a whisk in one hand and a phone in the other, frantically googling “why is my cheese sauce lumpy?” Spoiler: I overheated the milk. But when that golden, bubbling casserole came out of the oven, the smell alone made me forget every mess. It was like a warm hug in a dish, and honestly, I didn’t even care that I’d used the wrong pasta shape. (Elbows are traditional, but shells work too — live a little.)
If you’re craving comfort food that feels like home, this Baked Mac and Cheese is it. It’s the kind of recipe that makes your whole house smell like love and butter. And hey, if you’re looking for more cozy mains, check out these Main Dishes — because one good thing deserves another.
Why You’ll Love This Recipe
It’s pure comfort food
There’s something magical about that first bite of creamy, cheesy pasta with a crispy top. It’s like your taste buds are getting a hug. Whether you’re sad, tired, or just need a pick-me-up, this dish delivers.
Cheaper than takeout
A box of pasta, some cheese, and a little milk cost way less than ordering in. Plus, you get leftovers. Win-win. I once fed four friends with this and they all thought I’d spent a fortune. Nope — just smart shopping.
Even picky eaters devour it
Kids, adults, picky partners — everyone loves mac and cheese. I’ve never met a human who turned down a scoop of this. It’s the great unifier at the dinner table.
Great for meal prep
Make a big batch on Sunday, and you’ve got lunches for days. It reheats surprisingly well (more on that later). I’ve even frozen portions for lazy nights when cooking feels impossible.
Date-night worthy
Want to impress someone without stressing? This dish says, “I care,” without being pretentious. Serve it in cute bowls with a sprinkle of parsley, and boom — you’re a culinary genius.
The flavor is addictive
That perfect balance of creamy sauce, gooey cheese, and crunchy topping? It’s impossible to stop eating. I’ve caught myself standing at the counter with a fork, telling myself “just one more bite” for the fifth time.
Ingredient Breakdown
Here’s what you’ll need:
– 1 pound elbow macaroni (or shells, or cavatappi — whatever you’ve got)
– 4 tablespoons butter (the real stuff, not margarine — trust me)
– 1/4 cup all-purpose flour
– 3 cups whole milk (2% works, but whole is dreamier)
– 1 teaspoon salt
– 1/2 teaspoon black pepper
– 1/2 teaspoon paprika (smoked paprika if you’re feeling fancy)
– 4 cups shredded cheese (cheddar is classic, but I love a mix — more on that below)
– 1/2 cup breadcrumbs (panko for extra crunch)
Now, let me tell you why these matter. The butter and flour make a roux — that’s the base of your cheese sauce. Skip this step, and you’ll end up with a sad, separated mess. I learned that the hard way when I tried to “shortcut” by melting cheese directly into milk. It was a gloppy disaster.
For cheese, please don’t use pre-shredded bags. They have anti-caking powder that makes your sauce gritty. I once bought the cheap stuff to save time, and it was a mistake I’ll never repeat. Grate your own — it takes two extra minutes and makes a world of difference.
The milk? Whole milk gives you that rich, velvety texture. I’ve tried almond milk once (desperate times), and while it worked, it wasn’t the same. If you’re dairy-free, see the substitutions section.
And breadcrumbs? They’re the secret to that glorious crispy top. I forgot them once, and my mac and cheese felt naked. Don’t let that happen to you.
Step-by-Step Instructions
Prep your ingredients
Start by grating all your cheese. I know, I know — it’s annoying. But do it anyway. While you’re at it, measure out your butter, flour, and milk. Having everything ready makes the process smoother. (Unlike that time I tried to grate cheese while the roux was cooking — I almost burned it. Oops.)
Cook the pasta
Boil your pasta in salted water until just al dente. You want it slightly undercooked because it’ll keep softening in the oven. I always set a timer for one minute less than the package says. Once, I forgot and ended up with mushy mac. Never again.
Make the cheese sauce
Melt butter in a large pot over medium heat. Add flour and whisk constantly for about 2 minutes — you’re cooking the raw flour taste out. This is where I’ve burned it before by walking away “just for a second.” Don’t do that.
Slowly pour in the milk while whisking. If you dump it all at once, you’ll get lumps. I learned this when I was rushing and ended up with a sauce that looked like cottage cheese. Not cute.
Keep whisking until the sauce thickens enough to coat the back of a spoon. This takes 5-7 minutes. Be patient. Add salt, pepper, and paprika.
Remove from heat and stir in the cheese a handful at a time. Let each addition melt before adding more. This is therapeutic if you’re in the right mood. If the sauce gets too thick, add a splash more milk.
Combine and assemble
Drain your pasta and add it to the cheese sauce. Stir gently until every piece is coated. Pour into a greased 9×13 inch baking dish. I once used a dish that was too small, and cheese sauce bubbled over into my oven. Now I always put the dish on a baking sheet just in case.
Add the topping
Mix breadcrumbs with a little melted butter and sprinkle over the top. This is where you can get creative — add some parmesan to the crumbs, or even crushed crackers if that’s what you have.
Bake
Bake at 350°F for 25-30 minutes, until bubbly and golden. If the top isn’t brown enough for you, broil for 1-2 minutes. Watch it like a hawk — I’ve burned the topping by getting distracted by TikTok. (Don’t judge.)
What to Serve With
Simple green salad
The acidity cuts through the richness. I love arugula with lemon vinaigrette. It’s like the mac and cheese’s sophisticated friend who makes it look good.
Roasted broccoli
The slight bitterness of broccoli balances the creamy pasta. Plus, it makes you feel slightly healthier. I roast mine with olive oil, salt, and a pinch of red pepper flakes.
Garlic bread
Because more carbs is always the answer. The crispy, buttery bread is perfect for scooping up extra cheese sauce. My kids fight over the last piece every time.
Sliced apples or grapes
The sweetness and crunch provide a nice contrast. Plus, it’s an easy way to add fruit to the meal without making a separate dessert. I discovered this when I was out of salad greens one night.
Pro Tips and Variations
Spice it up
Add a pinch of cayenne or some diced jalapeños to the cheese sauce. I once added too much cayenne and my mouth was on fire, but in a good way. Start small — you can always add more.
Make it vegetarian
This is already vegetarian, but check your cheese labels. Some use animal rennet. If you’re serving vegetarians, look for “microbial rennet” on the package.
Gluten-free option
Use gluten-free pasta and cornstarch instead of flour for the roux. I’ve done this for friends with celiac, and they were thrilled. The texture is slightly different but still delicious.
Upgrade for guests
Add lobster meat, crab, or even truffle oil for a fancy version. I once made this for a dinner party with truffle oil, and people still talk about it. It felt fancy without being fussy.
Seasonal twists
In fall, add roasted butternut squash. In summer, stir in fresh corn and tomatoes. I tried the corn version on a whim, and it tasted like summer in a bowl.
Reinvent leftovers
Turn extra mac and cheese into fried balls. Roll cold mac into balls, coat in breadcrumbs, and fry until golden. They’re ridiculous and wonderful. I made these for a Super Bowl party, and they disappeared in minutes.
Storing and Reheating
Fridge: Store in an airtight container for up to 4 days. Freezer: Freeze for up to 2 months. I once froze a big batch and forgot about it — found it a month later and was thrilled.
Best reheating method: Oven at 350°F, covered with foil, for about 20 minutes. Microwave works in a pinch, but the texture suffers. I microwaved some once and it turned into a weird, separated mess. Lesson learned.
What holds up: The flavor stays great. What turns rubbery: The pasta can get a bit soft, and the sauce might separate slightly. It’s still tasty, just not quite as perfect as fresh.
Customizations for Special Diets
Gluten-free
Use gluten-free pasta and cornstarch or rice flour for thickening. I’ve tested this, and while the texture is a bit different, it’s still comforting and good.
Dairy-free
Use plant-based milk (unsweetened) and dairy-free cheese. The sauce won’t be quite as creamy, but it works. I tried this with almond milk and vegan cheese once for a lactose-intolerant friend — she was grateful, and it wasn’t bad.
Low-fat
Use low-fat milk, reduce the cheese by half, and add some nutritional yeast for cheesiness. It won’t be as indulgent, but it’s still satisfying. I make this version sometimes when I’m trying to be “good.”
High-protein
Add cooked chicken, ground beef, or even white beans. I stirred in some leftover rotisserie chicken once, and it made the dish more filling and balanced.
Common Mistakes to Avoid
Using pre-shredded cheese
The anti-caking agents prevent smooth melting. I made this mistake early on and ended up with a gritty sauce that broke my heart. Grate your own — it’s worth it.
Overcooking the pasta
If it’s too soft before baking, you’ll end up with mush. I’ve done this when I got distracted by a phone call. Remember: it keeps cooking in the oven.
Rushing the roux
If you don’t cook the flour long enough, your sauce tastes like raw flour. I once served this to friends, and while they were polite, I knew it wasn’t right. Give it those full 2-3 minutes.
Adding cheese to boiling sauce
High heat makes cheese separate and get oily. I learned this when I was impatient and added cheese while the sauce was too hot. Take it off the heat first.
Skipping the breadcrumb topping
It adds texture and prevents a weird skin from forming. I forgot it once, and the top was rubbery. Don’t skip this step unless you have a good reason.
Frequently Asked Questions
Can I make this ahead of time?
Yes! Assemble it, cover, and refrigerate for up to 24 hours. Add 10-15 minutes to the baking time. I do this for holidays so I’m not stressed last minute.
Why is my sauce grainy?
You probably used pre-shredded cheese or overheated it. Next time, grate your own cheese and add it off the heat.
Can I freeze it?
Absolutely. Freeze before baking for best results. Thaw overnight in the fridge, then bake as directed. I’ve done this with great success.
What’s the best cheese to use?
A mix is ideal. Sharp cheddar for flavor, mozzarella for stretch, and something fancy like gruyere or gouda for depth. I usually do 2 cups cheddar, 1 cup mozzarella, 1 cup something else.
Can I add vegetables?
Yes! Roasted broccoli, cauliflower, or even spinach work well. I add them to the pasta before mixing with the sauce. Just make sure they’re cooked and drained.
Troubleshooting
| Problem | Cause | Solution |
| :— | :— | — |
| Sauce is too thin | Not enough flour or not cooked long enough | Make a slurry with 1 tbsp flour + 2 tbsp cold milk, whisk in, and simmer |
| Sauce is too thick | Too much flour or cooked too long | Add warm milk, a few tablespoons at a time, until desired consistency |
| Cheese separated or oily | Too much heat or wrong cheese | Lower heat, use better quality cheese, add cheese off heat |
| Pasta is mushy | Overcooked before baking | Undercook pasta by 2 minutes next time, check package timing |
| Top isn’t crispy | Not enough breadcrumbs or oven too low | Increase oven to 375°F or broil for 2 minutes at end |
Final Thoughts
This Baked Mac and Cheese has been my kitchen companion through good times and bad. I’ve made it for celebrations, for sick friends, and for those nights when only something warm and cheesy will do. It’s not fancy, but it’s real — and that’s what makes it special.
I’d love to hear how yours turns out. Did you add bacon? (No judgment — I’ve done it.) Did you burn the topping? (I have too.) Cooking is about the journey, not perfection. So tell me in the comments: what’s your favorite comfort food? And if you make this, tag me — I want to see your cheesy masterpiece.
Now, if you’ll excuse me, all this writing has made me hungry. I think I need to go make another pan. You know, for research.
My Grandma’s Baked Mac & Cheese — The One That Makes Everyone Forget Their Problems
Ingredients
- 300g elbow macaroni — the little curves hold the sauce like a dream
- 50g butter — real butter, not margarine, I mean it
- 50g plain flour — for the roux, don’t rush this part
- 500ml whole milk — warmed, so it doesn’t shock the roux
- 200g mature cheddar — grated, the sharper the better
- 100g mozzarella — for that stretchy, gooey pull
- 50g parmesan — because we’re being extra
- 1 tsp mustard powder — trust me, it makes the cheese sing
- Salt and pepper — to taste, but don’t be shy
- 50g breadcrumbs — panko if you have them, for max crunch
- A pinch of smoked paprika — optional, but it adds depth
Instructions
- Preheat your oven to 180°C/350°F. While it’s heating, cook the macaroni in salted water until just al dente — you want it slightly underdone because it’ll keep cooking in the oven.
- Drain the pasta and set it aside. Honestly, try not to eat half of it straight from the colander like I always do.
- In a large saucepan, melt the butter over medium heat. Once it’s bubbling gently, add the flour and whisk like your life depends on it for about 2 minutes. You’re making a roux, and it should smell nutty, not burnt.
- Slowly pour in the warm milk, whisking constantly to avoid lumps. Keep going until it’s smooth and starting to thicken — about 5 minutes of whisking. Your arm will hurt, but keep going.
- Reduce the heat and add the cheddar, mozzarella, and parmesan. Stir until melted and gloriously gooey. Add the mustard powder, salt, and pepper. Taste it. Adjust if needed — it should be bold.
- Combine the pasta and sauce in a big bowl. Fold gently so every piece is coated in that cheesy magic.
- Pour it into a buttered baking dish. Sprinkle the breadcrumbs and smoked paprika on top. If you’re feeling wild, add a little more cheese here.
- Bake for 25-30 minutes until the top is golden and bubbling at the edges. Let it rest for at least 10 minutes before serving — I know it’s hard, but it’s worth it. Serve with a big spoon and watch people’s faces light up.